Restoring an old cottage...

Category: walls (Page 1 of 2)

The Most Overengineered Shower Cubicle Ever

It’s just hit me today that this bathroom is quite the undertaking. I mean, it’s not like we’re just ripping out an old bathroom and installing a new one. Maybe rerouting a few pipes. Bit of tiling.

Nope; we’re installing a full bathroom with shower wetroom area into a room that has never been a bathroom before and it is an epic project. So Imma stop moaning about how long it’s taking, and instead be impressed with us. Or roll my eyes at us. One of the two…

We are making a lot of mistakes. But that’s okay; we’re learning from them, and then making entirely new and exciting mistakes, and learning from those too. We’re realising that every single job we want to do requires us to have done three tasks previously, and each of those required pre-work too. It’s brain-melting.

And because we are not builders or plumbers or responsible adults, we’re freaking out about what we need to do, and massively overengineering everything. Remember our massive floor and ceiling joists that will probably outlast the heat death of the universe? Well, we may have gone slightly overboard with the stud walls too. I think Joe’s builder friend raised an eyebrow or two. But more on that in a moment.

We’ve essentially divided the bathroom into three parts:

  1. The main space, for the bath, sinks, massive houseplants, and an incredible utterly weird chair I’ve found in a local junk shop.
  2. The toilet cubby hole place.
  3. The shower cubicle.

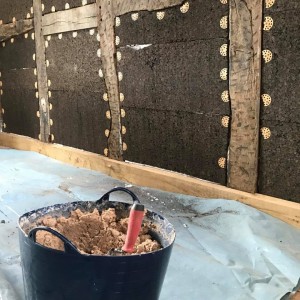
We’ve built a stud wall divinding the shower and toilet areas, and then stud walled the back wall of the shower too, so we can put piping back there and build a niche into the wall. Then we straightened up the end wall that’s actually attached to the house with battens and marine ply.

Batten frame built out from wonky old wall, so we can create a tiled wall that is straight

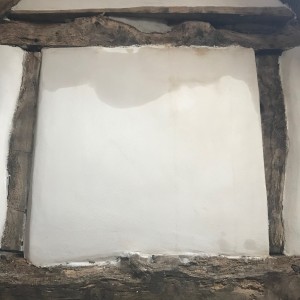
Walls are juuuuuust a little wonky

You can see the amount of lean if you look at the bottom of the batten frame. This was our second attempt, by the way. The first time, we fixed the marine ply to it, then went away from the room for a few days. When we came back, we thought it looked a bit… off. It was. A spirit level showed us we weren’t even close to vertical, so it all had to come off. You might think we’re being super-fussy and we are, but we also know that if the walls aren’t vertical and square in the shower area, the tiling will look awful.

So we did it again, and got it cock on:

Spirit level showing the panel is now vertical

Ooh so satisfying

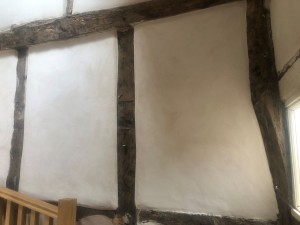
Then we built the stud wall that will form the end of the shower area and divide it from the toilet area. As you can see, it’s quite sturdy:

Overengineered stud wall dividing the bathroom

Studly stud wall

Then we did the same thing along the back wall, to create space for the pipework and to create a niche for bottles and soap and all the gubbins we use in a shower.

Joe pretends to shower in front of the new stud wall

Scrubbing up good

We’ve built a niche and also a backboard to fix the shower valves to. This may be one of our mistakes, but if it turns out to be, we rectify it in future… we’ve decided to have the shower on the stud wall to the left, the part projecting into the room.  But the shower valves will be on the back wall, so we can turn on the shower before getting into it—so we don’t get blasted with cold water.

However, there is going to be no way to remove the wall to get at the pipes should there be a leak—so we’re taking a bit of a risk here. We’ll obviously throughly pressure test everything but if we do have a leak, we’ll have to rip the wall apart to fix it. If that happens, we’ll relocate the valves and plumbing to the stud wall that protrudes, and install a removable panel so we can get at it. I dunno if we’re being foolish or not. Maybe future us will curse present us. Who knows!

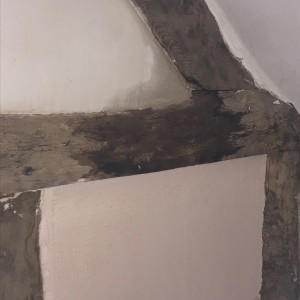
Here’s the niches in progress:

3-sided batten box with marine ply backing to create niche

Niches. Where there are riches, apparently.

And that is all for now. Join us again to find out how we manoever a massively heavy shower tray into place without destroying it and us…

Walls on Top of Walls

The room that will become our bathroom is on the first floor of the Victorian stone portion of the house. The stone walls have been lime plastered in the past, patched with gypsum plaster, and then skimmed with gypsum, painted, wallpapered, painted again, and generally added to over the years.

As we’ve taken layers of wallpaper and paint off, we’ve had a bit of a conundrum: plaster has come off in places too, which is pretty common in old houses. Plus the tops of the walls, where they disappear into the ceiling, were a right mess.

Old walls with plaster crumbling

Messy messy walls

What to do?

Do we patch the holes and skim over?

Pull all the plaster off and start again from scratch, filling in all the big holes?

Or do we build a new set of walls inside the old walls, leaving the surfaces as-is, and have a more-or-less square room?

Vicky was in favour of pulling the whole lot off and starting again; Joe was in favour of building a framework inside the walls.

In the end, when faced with the magnitude—and dusty mess—of basically pulling down the walls, we decided to batten the walls and put up wood-wool panels ready to take lime plaster.

Battens going into the wall to hold the wood-wool panels

Battens going into the wall to hold the wood-wool panels

Our main concern was losing too much room area by effectively bringing in all the walls by a couple of inches each—but it’s a large room.

How We Did It

We bought a whole bunch of 38 x 18 mm battens from B&Q, and fastened them to the walls as a frame. We measured the frame so that the wood-wool panels from Ty-Mawr would fit neatly to them.

This was actually a monumental pain in the butt because it involved masonry drills and not really knowing whether or not any of our plans would actually work…

Writing on wall reads: Vicky + Joe made this bathroom Winter 2021. It was both fun and a right pain in the arse. S0 WHY HAVE U TAKEN OUR WALLS DOWN?

We really did have a right old time with this

We piloted through the battens to prevent them splitting, then used a masonry drill bit to put holes through the plaster and into the solid stone of the wall.

This proved super-irritating because quite often we’d miss a stone, or it would shift, or the gods of renovations would just be in a bad mood that day. It was a trying time.

Once the holes were drilled, though, we screwed the battens into the walls using 120mm concrete screws. That frame is solid as a very solid thing.

We were genuinely worried we were not going to be able to find anything to work on those walls, and that we would end up having to pull all the wall surfacing down and start again. Thankfully, though, the screws held and we were able to start fixing the wood-wool panels thusly:

Wall, battens, and the first wood-wool panel screwed into the bottom of the wall

First panel goes on

These lining panels are simply screwed into the battens using wood screws and big plastic washers to spread the load and prevent the screws being pulled through the panel. They’ll take lime plaster beautifully. The room already looks vastly different:

Room’s looking swish and ready for plastering

Room’s looking swish and ready for plastering

Looking much tidier

Looking much tidier

One of things we’re pleased with is the main window, which was a right mess. The window “ceiling” was pretty much open to the eaves and we were losing loads of heat, so we stuffed a bunch of insulation up there, then built a mini-frame with battens to hold the wood-wool. We had to make wedges because the window slopes backwards, and we needed to leave as much of the oak windowframe visible as possible to allow as much light in as we could:

IMG_6482

Then we fixed the wood-wool panels and now a multitude of horrors are hidden, the wind no longer whistles in, and it’s tidy tidy tidy:

Fully paneled window return

Look at that! Out of sight, out of mind…

We’re pretty chuffed with the result and we’re excited to see how the plastering goes.

The room still feels pretty large for a bathroom, it’s much warmer, much more soundproof, and it’s definitely going to be easier to work with.

We’re getting quotes for plastering to be done for us because we don’t fancy plastering the ceiling and dealing with the loft hatch. The plan is to have softly rounded plaster around the window frames, and oak windowsills, which we’ll need to install before any plastering is done.

Then we’ll be creating a waterproof shower cubicle by building a stud wall and lining it with specialist tiling wall panels and a ceiling panel that are all fully waterproof—then tiling it.

More on that next week…

Oh—and also!

Ken came along and built us a new doorframe:

A wonky old doorframe made from bits of crappy leftover wood scraps

Before: wonky and saggy

New oak doorframe

After: beautiful wonky oak doorframe

You may be wondering why we didn’t just straighten up the top of the doorframe. Which is a reasonable question.

You can see the stonework above the doorframe—there was no proper stone lintel, and we didn’t fancy taking out that structural stonework to make the doorway higher. And to level it below the stone would mean an extremely low doorway for Joe to limbo through. So wonky it remains. Much like the rest of the house.

Then we had a quote for an oak door from the guy who does our windows (who is amazing) and we laughed and laughed and decided a summer project for us would be to make our own oak door because how hard can it be?

The Floor + Ceiling of Almost-Certain Death

When you think about a floor, what do you picture?

Boards, maybe a carpet or rug… and beneath it, strong sturdy wooden joists built to last forever (more or less) and carry multitudes of footsteps..

That’s what we picture.

What we don’t picture is THIS:

The underside of the bathroom floor, scraps of timber joined with bolts

Fun with floors!

Note the poorly joined random scraps of wood.

This part was fun too—see the actual gap where the joist fails to connect with the beam?

Bits and pieces of timber joined to fill gaps when the staircase was removed

This is where an old staircase used to be

This is actually cool though because from the shape of it and the retro-bodging, we’re pretty sure there was a staircase in this corner of the room. We know this end of the house—the stone portion—used to be the village shop, and we think it may have been two separate dwellings at one point. So it makes sense that it’d have its own staircase.

Honestly I don’t know how we didn’t fall through that floor in the four years we used it as a bedroom.

But no more! Because we’re finally turning the Stone Room into a bathroom and the Rayburn Room into a library. Hurrah!

Before we go on, though, let us say this: although we’ve uncovered some fairly horrifying electrics and alarming structural stuff, we’re having a great time. Not just because this is genuinely fascinating and fun and we’re learning lots, and it’s extremely satisfying creating a home with our own hands…

But also because we’re getting a real insight in the history of the house and the resourceful and innovative (and delightfully eccentric) people who’ve lived here.

It’s a story of people who wanted to reuse as much as possible. Who perhaps didn’t have a huge amount of money, so did what they could with what they had. And who were absolutely unafraid of electricity.

We’re so grateful that we get to peek into some of this history, and catch a glimpse of the personalities who’ve lived here over the centuries. What a privilege to be the caretaker of a place like this 🙂

So. Here’s what we’ve done over the past few weeks, since the bats moved out (actually they never moved in again we don’t think, but we still held off work until the start of September)…

Stone Room Ceiling Horrors

We started by pulling down the ceiling in the upstairs Stone Room. My dad came to help and got thoroughly covered in dust, bat poo, and general awfulness from a roof space filled with 150 years of living. Oh, and we all enjoyed the exciting wiring, which makes absolutely no sense at all.

My dad in a mask up a ladder sorting errant wiring

My dad shortly after I yelled at him and Joe because they weren’t wearing masks

That ceiling structure, too, was made of spiderwebs and hope, but at least it didn’t have to actually hold anything up.

It came down pretty easily, which is when we spotted this:

View up into the eaves of the rubble wall, with loosely packed terrifying rocks

The Giant Death Rock of Damocles: yes, it’s that massive one right in the middle

This boulder is so big that we couldn’t lift it out. So we were somewhat alarmed when we touched it and it moved. And not just a fraction, but in a menacing way that suggested it had had enough of sitting in the roof space and was ready to come down and start a fight.

You’ll notice it’s positioned perfectly above the doorway and it absolutely would have crashed through the brittle plastic ceiling panel (not kidding it was plastic), onto the unfortunate person’s head, and thence through the floor to the Rayburn Room below. And probably from there into the molten centre of the Earth.

The first thing we did was mix up some lime mortar and cement it back into place, along with a few of its smaller but no less rowdy siblings.

So we’re no longer afraid of giant death from above, which is a relief.

Next up: clear debris from the tops of the walls and find stones suitable for drilling into and affixing a ring beam.

We levelled this around the room so it’s very horizontal. We’re pretty smug about this which is amusing because it’s now the only horizontal thing in the house.

Joe and my dad drilled 16 mm holes into the stone walls, and we inserted threaded steel rods. We hung off them to make sure they were strong enough. I think you could probably hang a car off them.

Joe angle grinds the bolts to a more sensible length. Many sparks.

Pretty fireworks so I immediately stopped proceedings to put up a firewall…

We are extremely ingenious and use a snow shovel to protect the flammable stuff from sparks

Very sophisticated firewall to prevent sparks from starting a fire that’d kill us all

In fact, we’re fairly sure that if the rest of the house falls down, that ceiling structure we’ve built will remain standing.

Next up: some scribing, maths, a little bit of swearing and sweating, and we drilled some holes into the ring beam to correspond with the wall bolts—and held our breath as we finagled it into place.

The ring beam placed above the bolts so we could scribe the distances and drill holes that actually fit

Much careful measuring and drilling of holes…

It fits! Hurrah!

Bolts in, and it’s time to do the other side.

Joe and I repeated the process on the opposite side of the room, et voilà! We have a ring beam.

Ring beam fixed to the stone wall with great big bolts

Woo hoo! The holes all matched!


Next job: cutting the cross joists to length and fitting them to the ring beam with brackets. This was a fiddly job made more fun by working at height on a wobbly floor covered with pieces of chipboard that may or may not collapse at any moment.

We used little pieces of wood to make hangers so we didn’t have to hold massive pieces of wood over our heads, then wedged the joists in tightly, then screwed the brackets into place—and tightened up all the ring beam bolts which had loosened as we expanded the house.

Little piece of wood fixed to the large joist to position it

Making our job easier with spare bits of oak

We’re pretty pleased with the result. The ceiling is probably strong enough to hold a bathtub. It’s what you might call overengineered, but that’s cool. It’s not going anywhere.

Joe hangs by his hands from two of the new ceiling joists

Joe proves that we are fine workpeople

(Aside: this moment started a competition which has not yet ended. Joe did one pull up, so I did three. Then Joe did three. So I did four. And so on. We’ll continue this until one of us is dead.)

Joists all fitted and looking solid

The joists are in!

Look at how wonky that roof is! Love it.

Then we fitted a loft hatch, because of course we did. Here it is, floating in a ceilingless ceiling:

The loft hatch ladder hangs down, forlorn and alone, in a ceilingless room

Loft hatch to nowhere

The ladder is very long and as yet uncut. Joe looks on, gurning.

Think there might be more ladder than room here

At some point, of course, we’ll put up a proper ceiling and cut the ladder down to size. But for now, we’re happy with our overhead installation art.


Moisture Management in Old Houses

Old houses are not the same as modern houses, and we can’t treat them the same way.

They’re designed to breathe and when they’re treated well, damp isn’t a problem.

Ancient buildings like this one don’t have a damp course in the walls to stop moisture being sucked out of the ground and into the walls. They also don’t have an air cavity in the walls to stop water transmission from rain on the outside surfaces to inside the house. Often there’s an oak frame that really does not mind getting wet as long as it has a chance to dry out afterwards.

Newly plastered wall panel

You can see the damp on the old brick panels

It’s really important to think about moisture management in an old house like ours.

It’s tempting to make efforts to stop the movement and transmission of this moisture altogether. Here’s some stuff people do to old houses to try to accomplish this:

  • Using modern waterproof grout to repoint all the stonework.
  • Laying a concrete slab under the ground floor
  • Using modern renders on the walls, internally or externally, to stop water moving around.
  • Painting with modern plastic paints.
  • Getting a damp-proof company in to inject the stonework with oily stuff to act as a damp course (many of these companies are absolute vandals when it comes to old buildings).
  • Pulling out original frame panelling and replacing it with modern bricks and mortar.

We found a lot of this stuff in The Dingle when we got stuck in, and it’s really common in old houses that have been “improved”. The problems are, though, that:

  • The concrete slab pushes water up the walls.
  • The modern grout traps water next to the stone. Cement grout is harder than the stone itself, so when the water freezes in cold weather, it puts pressure on the original stones and cracks them.
  • The new render on the outside of the house traps water against the frame and panels causing the frame to rot.
  • The brick infill panels trap water against the oak, ensuring it never dries out.
  • Internally, water vapour from breathing, cooking, and bathrooms is trapped inside, causing the walls to become permanently damp and develop mould.

All that well-intentioned effort makes such a house a horrible damp place to live, and eventually destroys the building.

So here is where we need to talk a little about lime and its purpose in an old house like The Dingle.

We can use lime as a mortar between stones and brickwork, and as a plaster to cover the stonework or anything else your walls might be made of. Lime is magical:

  • Lime is waterproof in that it soaks up moisture, and then releases it to the atmosphere.
  • Lime wicks water away from timber or stones and allows it to evaporate away.
  • Lime has natural anti-fungal properties and does not allow mould to grow.
  • Lime is a little bit flexible and does not crack easily.

Lime was essential in building a house like this one. If we remove the lime and replace it with cheaper modern equivalents, we will wreck the house. Stones will split, timbers will rot, walls will grow mould.

Modern materials are fine for modern houses, which are designed to be airtight and watertight. They are not fine for old houses.

If you own an old house and a tradesperson is talking about using modern mortar, plastic, concrete, modern paint… please please please think very hard before going ahead.

Get advice from someone who specialises in working with old buildings.

If you try to shoehorn modern methods into old houses, you could well be doing huge damage to your home.

The Magic Sponge: The Secret to Internal Lime Plastering

The original Dingle structure is oak frame with infill panels on top of stone walls. When the house was built the infill panels would have been wattle and daub — essentially sticks woven together and covered in daub (mud, clay, straw and manure) or lime.  Any paint would have been clay-based or a limewash. This method would have been perfect for the oak frame – it doesn’t weigh much, it keeps the weather out, it’s easily repairable using local skills, and it wicks water away from the oak and evaporates it to atmosphere, so the oak doesn’t rot. Perfect.

However, at some point the panels started to look a bit shabby and someone decided to replace them with bricks and mortar. This probably felt like a good idea: the local brickie liked the plan, bricks are pretty cheap, and who uses wattle and daub these days anyway?

The shabby panels get replaced.

A couple of seasons come and go, the house shifts a bit because it’s built on clay and doesn’t really have any foundations (foundations not being a thing before around 1800), cracks appear, and water gets between the timber and the bricks. Because it’s modern cement-based mortar, the water can’t go anywhere and starts eating the oak. Oak takes a long time to rot, but it does rot eventually.

When we moved into the house, we knew the panels had to go. The  bricks were soggy, the walls were damp, the oak was damaged and getting worse. We’ve posted about the task of replacing the panels themselves – it was quite the job.

Internally, after replacing the panels, we were left with this:

plaster 1

We replaced the panels with cork because: it breathes, doesn’t weigh much, is very insulating, and requires little skill to do (which suits us perfectly!). However that’s not really what you want the inside of your house to look like, so lime plastering is the next task.

Here’s how we did it…

**Disclaimer – I’m not an expert and you should probably get some grown-up advice if you’re considering tackling lime work yourself.

The Scratch Coat

Shopping

You will need:

  • Builders bucket
  • Hawk, trowel, pointing trowel and bucket trowel
  • Bucket mixer
  • Hemp lime (we got all our lime from Ty-Mawr in Brecon, who are super knowledgeable and helpful)
  • Finishing lime
  • Fibreglass scrim
  • A few cheap sponges (ours came from B&Q)
  • Gaffer tape
  • Something to cover your floor
  • Safety specs (lime is horrible, you do not want splashes in your eyes even a little bit, at all)
  • Spray bottle for water

plaster2

  1.  Give the wall a good brushing. Get any loose dust, bits of cork, and spiders off it.
  2. Apply gaffer tape to your timbers so you have a line to work up to, and any plaster that goes over the line isn’t staining the wood. (We learned this after making a right mess with a bunch of the timbers.)
  3.  Get a spray bottle and dampen the surface down.
  4. Knock up your lime. I used bagged non-hydraulic hemp lime for this job from Ty-mawr in Brecon. The lime is ready-mixed and just needs waking up. The idea is to get energy into it, which loosens it up and makes it easier to work with. We do this by chucking a 25kg bag of lime on the floor and walking on the spot on top of it for a few minutes. Then we open the bag and tip it into a builder’s bucket and mix with a bucket mixer for at least 20 minutes. If after that time it still feels a bit thick you can add maybe half a pint of water and keep mixing.
  5. Make a cup of tea, lug the bucket upstairs, and dampen the wall again. Cover your floor – this will be messy.
  6. Dollop the muck (that’s a professional term folks, don’t judge me) onto the hawk and get it onto the wall with the trowel. Aim for something like 10mm or half an inch thick. The first panel you do will be rubbish – don’t worry about it, you can do it again later. Watch some videos on YouTube to check out how the pros do it. The more plastering you do the quicker and easier it’ll be and the better you’ll get at it (funny that).
  7. Get the muck on the wall, get it more or less flat, and drink your tea.
  8. Scrim. Plasterers’ scrim is a reinforcing fibrous mat or cloth pressed into the plaster, creating a composite material. It strengthens the plaster and helps prevent cracking. In days gone by, a scrim would be jute or hemp sacking; these days it’s usually a fibreglass sheet on a roll. Cut a piece slightly smaller than your panel and sweep your trowel to press it into the plaster. Make sure the whole thing sits under the surface of the plaster.
  9. Clean your bucket and all your tools really well — you don’t want to start your next day’s work by chipping plaster off your nice new tools. Pay particular attention to your bucket and trowel. Bits in your bucket will make for scratchy plaster tomorrow.

And that’s it for a few days.

Sit back and worry about how you’re going to make it look tidy in the future.

The Top Coat

I was worried about this – I knew my skills were pretty minimal, I knew I wouldn’t get a beautiful professional finish… but I was honestly surprised how well it went. Our house is pretty wonky though, so wonky panels wouldn’t really matter so much.

(Editor’s note from Vicky: he did a cracking job. It looks beautiful.)

The top coat process is the same as for the scratch coat, except you’re aiming for maybe 3mm thick, and you’re trying to get the surface as flat as you can. I also had to deal with pillowing my panels (where the plaster curves away from you to meet the timbers). It looks great and we had no choice because of the size of the timbers… but I hope you don’t have to because it’s a faff.

When you’re halfway through this process you’ll be screaming inside. Something along the lines of: “I can’t get it flat!” and “It’s got scratches in it!” and “This is going to look shit!” and “I can’t do this, I’ll have to get someone in.”

Do not panic. Go and make another cup of tea (or at least leave the wall alone to dry for a few minutes).

The Magic Sponge

This is where the magic sponge comes in. Get your sponge thoroughly wet and squeeze it out. Put on some calming music. Now just spend 10 minutes with your sponge gently rubbing over the surface of the plaster. You’ll find the scratches disappear, the surface softens, lumps get evened out, edges get rounded.

It’s honestly magic.

Use your spray bottle if the wall is drying too quickly; dampen your sponge a bit if you need to. Get a feel for what’s going on and breathe a huge sigh of relief. It’s going to be ok.

When you’ve got it looking nice, stop. Peel off your gaffer tape.

Congratulations, you’ve done it!

Now you’ve just got to do the rest of the house.

plaster1

Health & Safety

Lime is pretty hard on your hands – it’ll dry out your skin and eventually your skin will crack. This is painful.

Wash your hands often and moisturise them regularly.

I had some pretty nasty cracks and burns on my hands after a few days of working with lime. I tried wearing plastic gloves but that just meant I had sweaty wet lime pressed against my skin for hours which did far more damage.

Happy plastering!

We’re Watertight! And Waney!

After a verrrrrrrry long summer in which nothing much happened at Casa Dingle, a lot has happened in the past three weeks.

The Front Soleplate

We discovered that the soleplate along the front of the house is solid! (Unlike the soleplate on the gable end which was thoroughly rotten.)

Soleplate over window

Surprisingly solid soleplate

So all Ken and Phil had to do was face it with a beautiful new piece of oak:

New soleplate facing

New soleplate facing

They did this because otherwise there would be a big ledge where the timber frame meets the wall. So now there is the original soleplate, the new oak facing, and the lead flashing over both – held in place by a piece of softwood which will form part of the frame for our new cork panels:

Showing how the soleplate and lead is fixed

Neatly layered timber

Here’s Phil oiling the new lead:

Oiling the lead

Shiny shiny!

And here’s the house looking alarmingly skeletal. Don’t worry, we’re assured it’s quite sound…

Ken's van in front of The Dingle

Ken Milloy: master conservation timber wizard

Over the next couple of weekends, we’ll be rebuilding those wall panels with cork and lime, and the house should warm and watertight. Because…

The Gable End Wall…

…has been weatherboarded!

Some time ago, we had plasterers come out to quote for plastering the exterior of the gable end wall, which streams water inside when it rains heavily. That end of the house gets all the weather and it suffers (hence the rotten soleplate and bricks).

Soaking wet every time it rains...

Soaking wet every time it rains…

That isn't a shadow...

That isn’t a shadow…

Their advice was to clad it in weatherboard to protect it, because we were unlikely to be able to make it watertight simply by plastering.

So we took their advice and asked Ken and Phil to sort it out, which they duly did.

They started by attaching battens and felt to the existing wall:

Battens and felt

Prep for the weatherboarding

We decided to go for waney edge oak boards, which means they retain their natural live wavey edge. It’s absolutely beautiful and looks much more natural than straight boards, and is also more in line with what the original builders would have done, had they chosen to weatherboard the house.

The electric company came and moved the power cables to a more suitable position, and updated from two cables to a single cable, so that was a bonus, and it now looks super tidy.

Isn’t this gorgeous? And it’ll weather down to silver over the next few months:

Gloriously weatherproof and stunningly detailed

Gloriously weatherproof and stunningly detailed

And just look at the wooden carved detail in the peak: our initials, and the year it went up 🙂

Vicky and Joe did this (well, commissioned it) in 2020, the Year of Weird

Vicky and Joe did this (well, commissioned it) in 2020, the Year of Weird

We’re thoroughly in love with the new end of our house. And even more in love with the fact that it’ll no longer rain indoors and blow a gale through the walls.

Thank you so much Ken and Phil, you’ve done an absolutely magnificent job.

Tomatoes, Walls, and 2020

We’re starting this entry with tomatoes because things at The Dingle have been delicious. The jam project this year will be magnificent. Vicky has grown the most enormous marrow ever. We have a shed-full of onions. And the tomatoes have been a triumph.

Tomatoes, blackberry jam, a giant marrow, and onions

Yum, yum, and thrice yum

Which is good because this has been 2020 and we think zombies are next. We’re also becoming increasingly convinced that we’re living in a simulation and the aliens running it are screwing with us.

It’s been… a weird year.

An awful one for a lot of people.

We’ve gotten to know loads of people in our village and it has been so glorious to see people looking after each other and getting to know each other well. We have new friends we might not have made before, because we were village wardens and volunteers.

So good has come out of woe.

But at Casa Dingle, things have been fruitful. And we’ve made a bloody big mess.

Again.

Plans Changed…

Our plans have changed slightly. The chaps at PlasLime recommended we weatherboard the gable end wall, so that’s what we’re doing. Ken is sorting it for us.

But next week, Ken will be back to put in a new sole plate along the front of the house because the one that’s supposed to be there… isn’t.

Which means a couple of weeks ago we replaced the top panels of brick and concrete (a rant on that will follow) with cork and lime. It looks splendid and the house now weighs considerably less.

We were a bit sad to find an original panel made with lathe and plaster. We couldn’t salvage it unfortunately because the entire panel had slipped down and become unstable. That was probably the only original one left:

Original lath and plaster wall

Sadtimes.

Here’s what the wall looked like a week ago:

Old walls

That’s all gone now…

You’ll see we had proper scaffolding delivered instead of trusting to the wobbly death tower. It was also 35 degrees C that weekend so we spent some time pretending we were on a balcony in Greece.

Me climbing through the wall

Proper safe scaffolding. It was a treat.

This weekend, we’ve been replacing the bottom panels. There are two more concrete panels.

The air has been blue. Because we cannot FATHOM why anyone would fill a timber-frame house panel with cast concrete and stock fence.

It must have been far more difficult to do than use bricks. And believe us when we say it’s been a complete bloody nightmare to remove. Really, really, REALLY awful.

And the mess. God the mess.

Rage.

Joe with a hammer drill

Hammer drill action and swearing

The concrete has also done a fine job of rotting the oak frame. Not all the way through, but enough to be a bit of a worry. The pic below shows a shake stuffed with concrete. The wood all around the concrete and a few mm in is rotten and crumbles away, which is not great.

What not to do with timber

Concrete in timber. Rot.

We’ve removed it, and the house is now happier and lighter and we can move on from the trauma of it all.

Oh, we also broke a window when some debris bounced off the wobbly death tower (yes that’s back).

Broken window

Oops.

Good job we’re having beautiful new oak windows later this summer, eh?

Next stop: panelling the walls with cork and lime again, Ken puts the soleplate in, then we badger Kelvin for our glorious new windows.

Hopefully not too long before the weatherboard happens too.

After that – it’s time to focus on the bathroom, which we’re going to turn into a plant-filled jungle paradise 🙂

Storm Dennis Stops By

Luckily, we don’t live in an area that floods – although the roads in and out of the village can get bad.

Late last year, Vicky’s old Xsara drowned on its way out of the village. It was at this point we decided The Dingle should have at least one vehicle that can cope with floods, mud, ice, and snow. So Harvey the Freelander joined us.

Anyway, this isn’t about flooding so much as it is about our plans for this year, which include getting Plas Lime back to plaster the outside of the gable end wall, and possibly the front of the house, too.

There’s no massive urgency, but we do want the house more watertight than it is right now by next winter…

IMG_6514 As you can see, there’s a little water soaking through…

IMG_6518

The great thing about lime plaster and cork, though, is this will dry out beautifully. If we’d used modern plaster and concrete, the walls would be in big trouble…

Strip Some Wallpaper, She Said

As several years’ worth of rain has fallen in the past week, we decided against knocking a hole in the front of the house today.

(Of course, it’s been sunny all day so we could have done the wall panel in the end.)

Instead, we fired up the wallpaper steam stripper, opened the windows in the Stone Room, and got stripping.

A Little Background

The Stone Room is the Victorian addition to the house. It’s a square, solid stone, two-storey structure stuck onto the left-hand side of the original house. It’s offset slightly too – it protrudes about four feet to the front of the house, presumably because of the shape of the banks behind the house. But who knows.

There used to be a window in the front until the 1950s (we think), then the previous owner filled it in. We haven’t decided whether or not to reinstate it yet, but we’ll definitely be rebuilding the in-fill because it looks a mess from the outside and we’d rather it blends in.

The Stone Room was our bedroom until a month or so ago, when we moved up into The Beautiful Attic. It’s going to become our huge, decadent bathroom.

There’s a small-ish window in the back, looking up the garden, and a tiny window in the side.

Small windows

We’re going to make the window on the left bigger

We have plans to make the back window much bigger and take it down to the floor so Vicky can lie in the bath and look up the garden.

Saturday Stripping

Before any of that happens, though, we need to strip the room back to its bones. We’ll need to replace the floor so it can take the weight of a bathtub (and, you know, people) and we’ll need to replace the ceiling because it’s a bit of a horror show.

Also, the roof leaks and the roof space is dark and full of terrors.

Awful mess

The Stone Room roof space is dark and full of terrors

We also wanted to investigate the impression on the far wall – you can see where there was once a fireplace. We’re not holding out much hope, but you never know… We’ll probably put one back when we start making the room beautiful.

Before beauty, though, comes The Great Horror.

We stripped all the structural anaglypta wallpaper off…

Stripper Joe

Stripper Joe

And we found some cool remnants of old pretty wallpaper:

Archaeological wallpaper

Archaeological wallpaper

That Escalated Fast…

And knocked some bloody great holes in the wall. Which was exciting.

Turns out there’s just random bricks shoved into the old fireplace, and we can still see the firebox and firebrick. Nothing pretty though.

A lot of plaster came off with the wallpaper, so we thought, “Sod it, let’s see what the stone walls are like.”

Turns out, the interior stone wall is in pretty good shape. It’ll need repointing and whatnot, but we may make it a feature stone wall and limewash it.

Big mess

Feature wall, yes?

The rest of the walls, we’ll repoint then insulate with cork boards (probably) and lime plaster. We may put some wood panelling up. No idea yet. Watch this space!

Creatures On The Ceiling

One thing we will miss about sleeping in that room is our Ceiling Creature Companions. When we had the timbers sandblasted, it created some interesting shapes on the plasterboard. Like this velociraptor:

The velociraptor

The velociraptor

And this kingfisher:

The Kingfisher

The Kingfisher

Anyway – having made a mahoosive mess, we’re done for the day. Tomorrow will be more of the same if the weather is wet, or we’ll knock a great big hole in the front of the house again.

Paint and Oil

The attic is almost done! The attic is almost done!

We’ve spent the Easter weekend painting the attic walls and ceiling in Flutterby clay paint by Earthborn. It’s delightful stuff: goes on easily and dries super-fast and looks gorgeous. Putting it on with a roller, it retains most of the lime plaster texture.

Then we oiled all the exposed timber with Osmo Polyx Oil – same as we used for the floor.

Doesn’t it look beautiful:

Vicky sitting on the floor oiling the timbers

Freshly painted and mid-Osmo

We still have to put skirting board up – but we’re getting Ken to come and take a look. He’s making us a door, too. And we’re getting some architectural glass to fit over the frame at the end. But other than that… we’re almost done.

We’d have been moving into the bedroom tomorrow if we’d read an email properly.

The bed-frame we have now is gorgeous, so we’re moving it up to the attic. But the mattress is pretty aged, so we bought a new one from Emma – it was 35% off and is rated as the UK’s best mattress, so we’re pretty chuffed with that. Paid extra for fast Saturday delivery, thinking it’d arrive Easter Saturday… only on checking the email, it said delivery for Saturday 27, which is too late. So I’m waiting for them to call me and rearrange delivery and give me my extra delivery cash back.

We’re so excited because we also have brand new duvet and pillows made from Merino wool, and gorgeous new bed linen from Cologne & Cotton.

And we have a chair, which I’m going to reupholster in some amazing fabric.

Tomorrow, I shall start making the attic cosy.

And we’re fitting the most magnificent light above the stairs…

Happy sunny Easter, Dingle fans 🙂

« Older posts

© 2024 Project Dingle

Theme by Anders NorénUp ↑