Restoring an old cottage...

Author: Joe Fraser

Moisture Management in Old Houses

Old houses are not the same as modern houses, and we can’t treat them the same way.

They’re designed to breathe and when they’re treated well, damp isn’t a problem.

Ancient buildings like this one don’t have a damp course in the walls to stop moisture being sucked out of the ground and into the walls. They also don’t have an air cavity in the walls to stop water transmission from rain on the outside surfaces to inside the house. Often there’s an oak frame that really does not mind getting wet as long as it has a chance to dry out afterwards.

Newly plastered wall panel

You can see the damp on the old brick panels

It’s really important to think about moisture management in an old house like ours.

It’s tempting to make efforts to stop the movement and transmission of this moisture altogether. Here’s some stuff people do to old houses to try to accomplish this:

  • Using modern waterproof grout to repoint all the stonework.
  • Laying a concrete slab under the ground floor
  • Using modern renders on the walls, internally or externally, to stop water moving around.
  • Painting with modern plastic paints.
  • Getting a damp-proof company in to inject the stonework with oily stuff to act as a damp course (many of these companies are absolute vandals when it comes to old buildings).
  • Pulling out original frame panelling and replacing it with modern bricks and mortar.

We found a lot of this stuff in The Dingle when we got stuck in, and it’s really common in old houses that have been “improved”. The problems are, though, that:

  • The concrete slab pushes water up the walls.
  • The modern grout traps water next to the stone. Cement grout is harder than the stone itself, so when the water freezes in cold weather, it puts pressure on the original stones and cracks them.
  • The new render on the outside of the house traps water against the frame and panels causing the frame to rot.
  • The brick infill panels trap water against the oak, ensuring it never dries out.
  • Internally, water vapour from breathing, cooking, and bathrooms is trapped inside, causing the walls to become permanently damp and develop mould.

All that well-intentioned effort makes such a house a horrible damp place to live, and eventually destroys the building.

So here is where we need to talk a little about lime and its purpose in an old house like The Dingle.

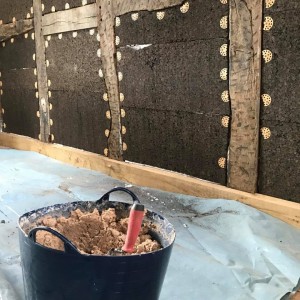
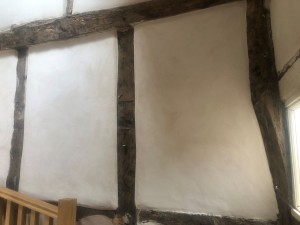
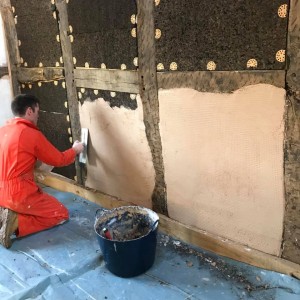
We can use lime as a mortar between stones and brickwork, and as a plaster to cover the stonework or anything else your walls might be made of. Lime is magical:

  • Lime is waterproof in that it soaks up moisture, and then releases it to the atmosphere.
  • Lime wicks water away from timber or stones and allows it to evaporate away.
  • Lime has natural anti-fungal properties and does not allow mould to grow.
  • Lime is a little bit flexible and does not crack easily.

Lime was essential in building a house like this one. If we remove the lime and replace it with cheaper modern equivalents, we will wreck the house. Stones will split, timbers will rot, walls will grow mould.

Modern materials are fine for modern houses, which are designed to be airtight and watertight. They are not fine for old houses.

If you own an old house and a tradesperson is talking about using modern mortar, plastic, concrete, modern paint… please please please think very hard before going ahead.

Get advice from someone who specialises in working with old buildings.

If you try to shoehorn modern methods into old houses, you could well be doing huge damage to your home.

The Magic Sponge: The Secret to Internal Lime Plastering

The original Dingle structure is oak frame with infill panels on top of stone walls. When the house was built the infill panels would have been wattle and daub — essentially sticks woven together and covered in daub (mud, clay, straw and manure) or lime.  Any paint would have been clay-based or a limewash. This method would have been perfect for the oak frame – it doesn’t weigh much, it keeps the weather out, it’s easily repairable using local skills, and it wicks water away from the oak and evaporates it to atmosphere, so the oak doesn’t rot. Perfect.

However, at some point the panels started to look a bit shabby and someone decided to replace them with bricks and mortar. This probably felt like a good idea: the local brickie liked the plan, bricks are pretty cheap, and who uses wattle and daub these days anyway?

The shabby panels get replaced.

A couple of seasons come and go, the house shifts a bit because it’s built on clay and doesn’t really have any foundations (foundations not being a thing before around 1800), cracks appear, and water gets between the timber and the bricks. Because it’s modern cement-based mortar, the water can’t go anywhere and starts eating the oak. Oak takes a long time to rot, but it does rot eventually.

When we moved into the house, we knew the panels had to go. The  bricks were soggy, the walls were damp, the oak was damaged and getting worse. We’ve posted about the task of replacing the panels themselves – it was quite the job.

Internally, after replacing the panels, we were left with this:

plaster 1

We replaced the panels with cork because: it breathes, doesn’t weigh much, is very insulating, and requires little skill to do (which suits us perfectly!). However that’s not really what you want the inside of your house to look like, so lime plastering is the next task.

Here’s how we did it…

**Disclaimer – I’m not an expert and you should probably get some grown-up advice if you’re considering tackling lime work yourself.

The Scratch Coat

Shopping

You will need:

  • Builders bucket
  • Hawk, trowel, pointing trowel and bucket trowel
  • Bucket mixer
  • Hemp lime (we got all our lime from Ty-Mawr in Brecon, who are super knowledgeable and helpful)
  • Finishing lime
  • Fibreglass scrim
  • A few cheap sponges (ours came from B&Q)
  • Gaffer tape
  • Something to cover your floor
  • Safety specs (lime is horrible, you do not want splashes in your eyes even a little bit, at all)
  • Spray bottle for water

plaster2

  1.  Give the wall a good brushing. Get any loose dust, bits of cork, and spiders off it.
  2. Apply gaffer tape to your timbers so you have a line to work up to, and any plaster that goes over the line isn’t staining the wood. (We learned this after making a right mess with a bunch of the timbers.)
  3.  Get a spray bottle and dampen the surface down.
  4. Knock up your lime. I used bagged non-hydraulic hemp lime for this job from Ty-mawr in Brecon. The lime is ready-mixed and just needs waking up. The idea is to get energy into it, which loosens it up and makes it easier to work with. We do this by chucking a 25kg bag of lime on the floor and walking on the spot on top of it for a few minutes. Then we open the bag and tip it into a builder’s bucket and mix with a bucket mixer for at least 20 minutes. If after that time it still feels a bit thick you can add maybe half a pint of water and keep mixing.
  5. Make a cup of tea, lug the bucket upstairs, and dampen the wall again. Cover your floor – this will be messy.
  6. Dollop the muck (that’s a professional term folks, don’t judge me) onto the hawk and get it onto the wall with the trowel. Aim for something like 10mm or half an inch thick. The first panel you do will be rubbish – don’t worry about it, you can do it again later. Watch some videos on YouTube to check out how the pros do it. The more plastering you do the quicker and easier it’ll be and the better you’ll get at it (funny that).
  7. Get the muck on the wall, get it more or less flat, and drink your tea.
  8. Scrim. Plasterers’ scrim is a reinforcing fibrous mat or cloth pressed into the plaster, creating a composite material. It strengthens the plaster and helps prevent cracking. In days gone by, a scrim would be jute or hemp sacking; these days it’s usually a fibreglass sheet on a roll. Cut a piece slightly smaller than your panel and sweep your trowel to press it into the plaster. Make sure the whole thing sits under the surface of the plaster.
  9. Clean your bucket and all your tools really well — you don’t want to start your next day’s work by chipping plaster off your nice new tools. Pay particular attention to your bucket and trowel. Bits in your bucket will make for scratchy plaster tomorrow.

And that’s it for a few days.

Sit back and worry about how you’re going to make it look tidy in the future.

The Top Coat

I was worried about this – I knew my skills were pretty minimal, I knew I wouldn’t get a beautiful professional finish… but I was honestly surprised how well it went. Our house is pretty wonky though, so wonky panels wouldn’t really matter so much.

(Editor’s note from Vicky: he did a cracking job. It looks beautiful.)

The top coat process is the same as for the scratch coat, except you’re aiming for maybe 3mm thick, and you’re trying to get the surface as flat as you can. I also had to deal with pillowing my panels (where the plaster curves away from you to meet the timbers). It looks great and we had no choice because of the size of the timbers… but I hope you don’t have to because it’s a faff.

When you’re halfway through this process you’ll be screaming inside. Something along the lines of: “I can’t get it flat!” and “It’s got scratches in it!” and “This is going to look shit!” and “I can’t do this, I’ll have to get someone in.”

Do not panic. Go and make another cup of tea (or at least leave the wall alone to dry for a few minutes).

The Magic Sponge

This is where the magic sponge comes in. Get your sponge thoroughly wet and squeeze it out. Put on some calming music. Now just spend 10 minutes with your sponge gently rubbing over the surface of the plaster. You’ll find the scratches disappear, the surface softens, lumps get evened out, edges get rounded.

It’s honestly magic.

Use your spray bottle if the wall is drying too quickly; dampen your sponge a bit if you need to. Get a feel for what’s going on and breathe a huge sigh of relief. It’s going to be ok.

When you’ve got it looking nice, stop. Peel off your gaffer tape.

Congratulations, you’ve done it!

Now you’ve just got to do the rest of the house.

plaster1

Health & Safety

Lime is pretty hard on your hands – it’ll dry out your skin and eventually your skin will crack. This is painful.

Wash your hands often and moisturise them regularly.

I had some pretty nasty cracks and burns on my hands after a few days of working with lime. I tried wearing plastic gloves but that just meant I had sweaty wet lime pressed against my skin for hours which did far more damage.

Happy plastering!

Plastering and all that

On the first floor, we have the gable-end wall that we’ve posted about earlier in the blog. There were 8 big rectangular panels of soggy bricks in a very old oak frame.

We’ve kicked the bricks out, replaced them with lovely cork (which is light, breathable, renewable, insulating, and basically perfect for the job).

Externally that’s had a scratch coat put on it, but does ned a second coat of lime to add a bit more weatherproofing and make it look pretty.  While this was going on, Ken Milloy, our splendid heritage timber man from Ludlow replaced the rotten sole plate and added a couple of repairs to the frame. I’d link to his website, but he’s a bit oldschool for that.

plaster 1

Internally, it’s getting

a couple of layers of hemp lime (that’s lime plaster with chopped up hemp in it).

The hemp does good things ; it adds strength to the mix, just like adding fibres does. It also reduces the weight of the plaster, which is nice for both  the wall and the plasterer.

Yesterday we knocked up about 20kg of it, and I squashed it onto the wall.  Knocking up is the process of mixing the plaster to get energty into it, and it loosens up the mix and makes it easier to handle and spread around. We also added about a litre of water to it, to loosen it further, as it was pretty chewy and I couldn’t really spread it.

It’s unlikely that the finish will end up looking the same as the rest of the attic, so we’ll probably whitewash all the plasterwork to standardise the apearance internally.  Once the surface of the first layer was about where I wanted it to be – something between 3mm and 10mm, we pressed a mesh into it. The mesh adds further strength to the layer, and will hopefully prevent cracking later on.

It was fairly hard work – both the mixing and the applying, but the end result looks ok to me.

I find jobs like this look terrible when you’re doing them, you’re so up close and examining every aspect of what you’re doing. If you go away and look at it an hour later you suddenly realise it’s fine, and it actually looks good. Almost like someone who knows what they’re doing has done it.  Almost.

plaster2

Next weekend we’ll hopefully get a few more panels done, if my blisters have subsided by then..

All the materials for this wall have been supplied by Ty-Mawr Lime, who have been hugely generous with their time and advice.  If you’re thinking of doing something like this, I’d really reccommend talking to them.

Giant sycamore coppice and other heavy things

When we first looked at the house, way back in February, there were three large stumps in the middle of the lawn, each with a few poles growing out of them.  By September they had transformed into a veritable coppice topping out at well over ten meters high, and a good eight meters across.

It was somewhat alarming to realise how quickly it had grown, and we feared if we gave them another year we might not have a lawn at all.

At the very least, it needed reducing in size and showing who was boss.  Out came the trusty chainsaw, and we took it from this (okay so this was taken in summer, but you can see how ridiculous huge it was):

Sycamore before

to this:

Sycamore after

A mere skeleton of its former self. But it’ll bounce back.

We also took out most of a dead apple tree, and made a start on the world’s most giant GardenStump:

Stump

At some point during proceedings, the wheelbarrow committed seppuku. I don’t think it ever really recovered from drunken midnight railway sleeper maneuverings…

Progress though. Progress.

Oh, also – the chickens appear to be digging a tremendous hole in the garden…

Tremendous Chicken Hole

Save

Save

Attic walls

The rules with an old house seem to be: Gypsum is bad. Plasterboard is bad.  Modern vapourproof insulation is bad.  None of that celotex or kingspan stuff.   It all adds to moisture imperviousness, and these old houses need to breathe.  If you don’t let the moisture out, your timbers rot.

We needed to create walls and insulate the space up in the loft, so we bought a boatload of this stuff – woodfibre board.  It came on a pallet, it’s light, dusty, fits up the stairs into the loft, and was pretty easy to cut and fit.

After a few hours of working with it, I think we got pretty good at fanangling it into corners and around tricky wonky beams and whatnot.

from this...

from this…

boarded walls

to this..


We’re quite pleased with that.  The really annoying bit is that we ran out of those fancy plastic washers that stop the screwheads pulling through the material, leaving the job unfinished..  That bit on the left on the next image- it’ll have to wait for next weekend.

ran out of washers..

ran out of washers..

Once that’s finished, we get it lime plastered and that’s that. Nice warm breathable walls.  And no squirrels.

Nettles

So you spend a couple of hours pulling up nettles. You’re left with a massive pile of the things, all a bit too wet to burn. Hundreds of kilograms. look:

2016-06-12 19.42.16

That’s a five foot high pile of nettles.

Upon showing this picture to people I know on facebook “Make nettle wine” was a suggestion.

“Make nettle soup!” was another. Just how much nettle soup is it possible to want?

My favourite suggestion though, was “Make nettle pesto!”  Seriously? Is there anyone on the planet that has a large enough lunacy to want to store three hundred kilos of nettle pesto?  What the hell would you do with it all?  How much would the olive oil cost?

Please, dear reader, whoever you are – feel free to nip over to our place and take as many nettles as you may wish for.  If you don’t like the look of the ready-harvested ones, you can even go and pull up your own.  There’s plenty.

Electrickery

There are a limited number of things I know about the chap who lived here before us.  He was well thought of by the village. People liked him, and enjoyed seeing him thrash his motability scooter at unprecedented speeds down the high street. As a younger man he’d run the local scout group, and there’s quite a few middle-aged chaps I’ve met in the pub who knew him when they were a child. These facts have been gleaned in the local pub. There’s only really one thing I know about him that comes from the house itself.

I know he had no fear of electricity.

I know this from the junction boxes, from the randomly placed pullswitches, from the wrist-thick bundle of cables that encircle the house at gutter level.

So, in an attempt to untangle the facts, we spent some time a few days ago finding out which MCB does what at the main consumer unit (which is halfway up the stairs)

So, here’s a rundown of what we found:

  • Main switch – nothing to report
  • RCD, 63 Amps. Somewhat unbelievably, this immensely complicated tangle is protected by a 30mA RCD.  I find this both reassuring, and amazing.
  • MCB1, Type B32.  Label: Cooker. Connected to.. the cooker. we’re off to a good start.
  • MCB2, Type B20. Label: Ring Circuit.  Here is where I’d expect all the wall sockets. Turns out it’s only the sockets in the attic, and one socket on the gable end bedroom.
  • MCB3, Type B20. Label: Stairlift. We don’t have a stairlift, so I was expecting this not to be connected to anything.  However, it runs the washing machine, the kitchen sockets and lights, one hall socket, the stone extension bedroom sockets and the immersion heater.
  • MCB4, Type B16. Label: Sockets. This one’s not connected to anything.
  • MCB5, Type B16. Label: Sockets. This supplies half of the sockets in the living room.
  • MCB6, Type B16. Label: Sockets. Nothing.  Nada.
  • Another RCD, 63Amps.
  • MCB7, Type B16. Label: Outbuilding. This supplies a bunch of external lights and the shed, which has it’s own consumer unit and more wiring than we can wrap our heads around.
  • MCB8, Type B16. Label: Sockets. This supplies a random smattering of sockets throughout the house, plus the lights in the stone extension ground floor.
  • MCB9, Type B20. Label: Sockets.  This powers the electric toothbrush.
  • MCB10, Type B32. Label: Water Heater. Not connected to a thing.
  • MCB11, Type B6. Label: Lighting. This supplied lighting to 70% of the house
  • MCB12, Type B6. Label: Lighting.  Lighting for one bedroom only.

Photo 25-04-2016, 19 39 29

So there you have it. I’m no expert, but should lighting and sockets be separate? Isn’t 20A a bit much for a toothbrush?

Looking at the cableruns, it looks like any time they wanted a new socket, light, or switch they simply looked for the nearest piece of wire, whether it be above or below, for lighting, sockets, ring or spur – and cut into it to splice a new bit in.

It’s not really salvageable.  The house will need a complete rewire. But it’s awesome fun!

We’d have loved to have met the previous owner. He seems like he was a real character – everyone has a good word to say about him. And he’s created this crazy, wonderful, quirky house – which looks insane, but everything works. I suspect he was something of an eccentric genius and I wish I’d known him.

Buttock detection devices

I found myself wandering aimlessly on what could be described as the lawn, but in reality would better fit the word ‘meadow’.  Long grass tickling my knees.  Hidden lumps and dips to stumble over and into.

I find a shed. In that shed is a shiny red motor mower.  It hasn’t moved for at least 18 months. I fancy myself a bit of a practical chap, so I take the battery out of it and I put it on charge in the shed for a couple of days.

It rains. Then there is sunshine. Then more rain. The grass starts looking long and luscious.  We either need to get some sheep – really soon, or that mower needs to start working.

Yesterday, there was some more sunshine, and an opportunity to see to the grass.  I remove the ignition barrel from the mower, and take it inside, to see if I can work out how to hotwire it. I’m amazed to find we actually have a key that fits. Back to the shed.

The battery has enough life to turn the motor over, but it won’t start.

I take the cover off the engine, check fuel and oil.

I try and pull-start the thing a few times. Doesn’t work.

I take the sparkplug out. It looks clean, fresh, and smells of petrol.  There’s no spark though.

No spark. So, it’s the battery, or the coil, or the HT lead.

I pull the battery out of my motorbike – I know it’s ok. I jump-lead that to the mower, and while the engine turns, it’s still not starting. Dammit.

The coil and lead look nice and clean. The air filter is fine.

A friend on facebook said “are you actually sitting in it when you try to start it?”

I look again at the wiring. There’s a lead that goes up under the seat. The mower has a buttock detector.  With jumpleads attached and actually sitting in the thing – it starts!

For the next hour or so, Vicky and I take turns pootling around the lawn drinking beer in the sunshine.  A thoroughly splendid way to spend a spring evening, away from the dust and heavy lifting of cottage renovation.

I might mow the lawn again this evening. Possibly tomorrow as well.

Motor Mower

Nasty, brutish and short – the life of a vacuum cleaner.

The vacuum cleaner had clearly been very bad in a past life.
It came out of the box full of hope and enthusiasm, smiling with red, plasticky joy. It took one look around and realised that its future would be short and brutal.

Sandblasting the inside of a house makes a significant mess.

The chap doing the blasting was excellent. He worked really hard, pulled long hours, and did a great job. Years and years of horrible black (and white, and yellow) paint has been removed from all the internal timbers in the house. And it all ends up as a fine dust, in the air, on the walls, in the carpet.

We spent yesterday cleaning up the house after three days of internal sandblasting. We got the kitchen looking quite nice, and certainly clean. At least we can have tea.

I moved to the rear lobby – and the hoover started its work. Years of spider construction projects were destroyed in moments. Civilisations were uprooted.

criminal hoovering
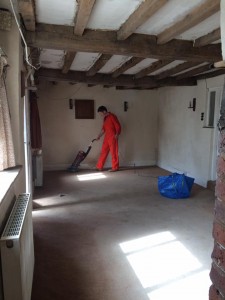
We then moved into the main downstairs room, where the new hoover spent a couple of hours working non-stop, and was emptied perhaps twenty times. There’s plenty more to get out of the carpet in that room, but we were running low on time.

All of the carpets on the first floor were cut into strips, rolled up and thrown in the skip. There’s no point trying to save those carpets – newspaper laid under them were dated 1980, and they’d clearly had a tough time. Under the carpet were significant carpetty strata, probably going back another 50 years.

Vicky will spend today sweeping and hoovering the first floor. I really don’t expect that hoover to see it’s first birthday.

Tomorrow will see us both back there, cleaning some more and getting the house ready to move into. There’s a lot of electrical wiring that needs clipping back to the freshly cleaned timbers. The house needs a complete rewire anyway, so it doesn’t need to be a permanent job, but removing the dangling hazards would seem to be wise, otherwise I suspect I’d come downstairs one day to find the hoover had ended it’s bitter, harsh life.

On Saturday we move in.

© 2024 Project Dingle

Theme by Anders NorénUp ↑