Restoring an old cottage...

Author: Vicky Fraser (Page 6 of 7)

Like Giant Drunken Jenga…

I love living here. The Sunday before last, we were in the pub having a pint, and I mentioned I was looking for railway sleepers to make raised vegetable beds. Farmer Leddy asked how many I wanted, and how long.

“Ooh, 16, about 2.4m long. Know anywhere?”

“Yep. I’ll ask.”

~ Fast forward to Monday morning ~

A tractor pulls up outside with a farmer hanging off it waving manically…

“I’ll be along in about an hour with those sleepers, alright?”

“Erm… Okay! Brilliant!”

A couple of hours later, and these are in our backyard:

All ready to move up the hill...

All ready to move up the hill…

Not too filthy, and all ready to move up the hill. Except they’re about 100kg each. Joe and I moved two of ’em, then decided it was a bit lairy. Slippery hill and potential broken legs and all that. It would have been okay if it was just moving them around on the flat.

So, last Saturday night, we were in the pub. Again. Three drunken farmer lads.

“We’ve got these sleepers…”

“Aye…”

“There’s plenty beer in it for you if you fancy helping us move ’em tomorrow please…”

“Tomorrow? Ha! Tomorrow is for WIMPS. We are men. We shall move them NOW.”

Joe goes off with three drunken farmer boys, and I wake up to this. If I hadn’t had an awful gin hangover, I would have laughed more loudly. As it was, I chuckled to myself quietly, then went back to feeling sorry for myself…

It's like a giant had enough and threw his toys out of the wheelbarrow...

It’s like a giant had enough and threw his toys out of the wheelbarrow…

So later on that day, when the woe had receded, Joe and I and my Dad created two raised bed masterpieces:

Not too shabby...

Not too shabby…

I’m going to line them with polythene so we don’t produce poisonous carrots and whatnot, then dig out all the grass and weeds, and fill ’em with topsoil and chicken poo.

I’m also going to create a border around them, either of gravel or wood chippings, so the grass doesn’t get all mashed up and muddy.

Next spring, we’ll be producing all manner of delicious goodies.

We Have No Walls Upstairs

It’s been all go here at The Dingle over the past couple of weeks. We’ve finished installing the eco-friendly insulating boards in the attic

~ (and, by the way, the professional lime plasterer who came around to give us a quote today said, “Who did this? It’s absolutely excellent. Some of the best I’ve seen.” *proud*) ~

and got Fish our joiner around to make a decision about the floor.

We didn’t so much get on with the floor as rip out everything on the first floor. From this, with the not-original dodgy stud wall:

Before, with the dodgy stud wall...

Before, with the dodgy stud wall…

To this. A big mess:

Just a wide open space...

Just a wide open space…

Now we’ve got all that space, we’ve got more options. So, here’s what we’re definitely going to do before we move up into the attic:

  • Take out the two beams supporting the attic floor. They were never meant to support a “proper” room, and according to the buildings guy who came round with Fish, were probably wall timbers supporting struts for lath and plaster before they became our ceiling.
  • Install two 8in x 8in oak beams to support the floor.
  • Knock out the “winking” panel so we can install said beams, and put in a new oak-frame window at the same time.
  • Maybe install new oak floor joists – the buildings guy said it’s not essential, but if it were his house he would do it. So we’re going to get a quote and see how much it’d add to the bill. We’d like to do it proper-like.
  • Move the stairs. The new hand-made oak stairs were going to go in the same place as the old ones, but it makes more sense now we’ve opened up the space to have them go up from the corner, more or less where the downstairs stairs come up.

So that’s all structural stuff we’ve to do, to make the building sound. All good, and it means we get a window into the Wonky Room so we’ll have more light.

Fish suggested we could put the bathroom into the Stone Room, which has given us something else to consider… It’d be an amazing huge bathroom, and I could  put a roll-top bath right in the middle, as well as a big walk-in shower…

We really need to sit down with pen and paper and decide on the layout upstairs – and how it’s going to relate to downstairs when we build the new kitchen at the back.

Anyway. In the meantime, we’ve discovered some treasures:

Old papers lining the plasterboard between the ceiling joists – from 1949 and 1950

Old papers lining the plasterboard between the ceiling joists – from 1949 and 1950

I’m going to save a couple of these panels, the ones in best condition, and varnish them and turn them into a little treasure. Same with some of the crazy wallpaper we’ve lost with the stud walls. I’d like to keep a little reminder of what was here before us.

And a rats’ nest:

Thankfully they moved out...

Thankfully they moved out…

Okay, so perhaps that’s not a treasure. And thankfully it’s an old abandoned nest. No rats here. But you can see the horizontal slots in the ceiling beam, which are odd – hence the idea they were once wall supports. And the beam itself isn’t sturdy enough, really, to support a floor. It’s like a trampoline up there…

There's a bit of a bend on this one...

There’s a bit of a bend on this one…

We’re leaving this timber in place. Partly because it’s so wonky I don’t know how we’d replace it. It’s aces. But mostly because when you jump up and down on it, it barely moves. We’re going to replace those supports with something beautiful though.

We had a quote today from a lime plastering expert, and it looks like we can get the attic plastered before Christmas which will be brilliant.

He’s solved the freezing wall problem – there’s some insulating lime plaster that gives you a “pillow” effect, so we can expose the timbers but still keep some of the chill off the wall. Looks like we’re looking at about £50 a square metre, which seems pretty standard from what I can find out.

Exciting stuff 🙂

The Attic is a Squirrel-Free Zone

So, yesterday was a super-productive day here at The Dingle. First thing, we utterly failed to go to parkrun. In our defence, it was raining…

But we did go to Kent’s in Hereford because Ronnie the builder from the pub told us it was the place to go for soffits.

So off we went.

Having no idea about these things, I figured we’d probably be shelling out a couple of hundred quid and it’d be a bit of a ballache fitting the things, because of drilling holes and putting vents in and that.

But on arrival, the helpful young man pointed out soffits with vents already within them – and we got 15 metres of the stuff, cut up small enough to fit in our car, plus a box of pins to fix them.

They’re not going to be visible at all, so we didn’t have to worry about what they looked like. And they’re not really true soffits anyway, they’re simply there to ensure no critters get into the cavity behind the rafters and set up shop there.

After a sustaining meal of boiled eggs and soldiers and a cuppa, we dragged everything up into the attic and got started.

There was a hazelnut in the middle of the floor. Like some kind of dire warning from the squirrel posse that this was their territory. Not to be deterred, though, we pressed on. Keeping a weather eye out for terrorist squirrels…

First job: removing all the bricks loosely fixed to the top of the dwarf wall. The previous owner had put them up there to make it less draughty – here’s what they looked like before we removed them:

Under the eaves with bricks...

Under the eaves with bricks…

And without. This is the front of the house:

Draughty...

Draughty…

And the back of the house. As you can see, there is no soffit here. We got a good view of the chickens bockling around in the courtyard…

Looks like there is actually a soffit on the front of the house

Looks like there is actually a soffit on the front of the house

Fitting the soffits was actually really simple, and only took us a couple of hours. We got a system going: Joe would measure all the distances between the rafters. I’d saw the soffit into the right lengths. Joe would nail them onto the timber.

Here’s the result – front of the house:

Tidy.

Tidy.

And the back of the house. Much less draughty:

Dusty.

Dusty.

A job well done. Not authentic, perhaps… but we’re beginning to realise that if we do everything exactly as it “should” be done, we’ll need a bottomless pit of money. So we’re concentrating on doing the best for the house – making sure it can breathe, making it as authentic as possible – but not bankrupting ourselves or driving ourselves crazy in the process.

We do have to chip out all the concrete that’s in contact with the timbers, though, because it rots the wood. Not breathable, see.

So that’ll be a fun job over the next few weekends.

We’re pleased with our progress today. Tomorrow (Sunday) we’ll be starting to fit the breathable, eco-friendly, insulated plasterboard.

Jobs still to do before the floor goes down:

  • Fit the plasterboard
  • Decide on lighting and wiring
  • Decide on plumbing locations for the shower room
  • Chip out concrete adjacent to timbers
  • Plaster the ceiling and walls
  • Paint the gable end wall for a textured look – or do we lime plaster it? Yet to be decided
  • Probably a bunch of other stuff we’ll discover later on…

Perhaps the most difficult job today was cleaning up afterwards. Up until now, the attic had been strewn with rubble, piles of dust and sand, old nails and tacks, and tools scattered everywhere. Now, the tools are neatly packed away, all the crap is gone, and the place is swept and tidy. Still very dusty, but it’ll stay that way for weeks, I’m sure…

Sandstorms in the Attic

We’ve been quiet for a while, mostly because we’ve been on holiday, but partly because we’ve been dithering.

There’s quite a lot to do. And we’re beginning to realise how clueless we currently are about, well, everything.

The oak flooring for the attic is arriving sometime in late October (we’ve put the dates back a little because of the amount we have to do) but before then we have tons of stuff to get on with. Here’s what we’ve done since the last update:

  • Joe and my dad – Adrian – stripped out seemingly miles of cables and nonsense from the attic. Strangely, the porch light and one of the lights in the Rayburn Room no longer work. Makes perfect sense.
  • Pulled out an uncountable number of tacks, nails, and cable ties from all the timber.
  • Removed the final bits of cladding and random battens.
  • Had some more sandblasting done.
To Sandblast or Not to Sandblast

One of our dithers was over whether or not to sandblast the timbers in the attic. We have enough cash to do the floor and the staircase before Christmas, but other than that, it’s getting a bit tight.

In the end, we decided to go for it because as Chris, our Super Sandblaster, pointed out: if it looks crap when we’ve done the rest of the room, we’ll be gutted. And it’ll be a right mess to do later.

We’re really, really chuffed we did because it looks ace. Here’s the before:

Attic space with original beams and pine cladding

Pre-sandblasting

And here’s the afters:

Sandblasted bricks and timbers

Stone end, after sandblasting (plus Hole of Doom)

He did the bricks as well, which is ace because they were a right mess, and we couldn’t tell what state they were in. As it turns out, there are many types of bricks in all manner of states.

Sandblasted end wall

End wall of the house, sandblasted

So we’ve just treated all the timbers for woodworm. We need to buy some more stuff to do the top beam and the floor. It’s odd stuff – it made Joe and I sneeze continually…

Concrete Nightmare

Once we’d done that, our next job was to tackle the panels between the floor and the ceiling slope. Interestingly, we found one panel that was still – we think – the original lath and lime plaster:

Original lath and plaster

Original building materials

I wish we’d realised before we knocked a chunk out. We’re leaving the rest of it in situ, obviously, and we’ll repair the hole we made…

Bad news for the other panels though. They’re concrete, and what looks very much like random lumps of cement. We honestly don’t know what we’re going to do with these, because if there’s no brick in the walls and we take all the concrete out, we might end up rebuilding that whole section of wall.

And it’s not just the top bit in the attic – the wall continues down into the Wonky Room below.

Any suggestions and advice welcome!

We did start chipping away at it, but it’s super-hard and it’s going to be a nightmare.

Original panel in the middle, concrete on either side

Original panel in the middle, concrete on either side

And the yukky concrete one – do we chip it all out and risk a hole in the wall? Or skim it and ignore it? I don’t want to leave it there, but neither do I want to rebuild an entire section of wall…

Concrete wall

Concrete wall woe

There’s another one of these on the other side of the original panel. And two more at the other end of the room.

What’s Next?

So, what do we have left to do before the floor arrives?

  • Put eco-friendly, natural plasterboard up on the rafters
  • Skim and paint the ceiling
  • Skim the walls? Or leave the bricks bare? Probably skim them, because they’re quite gappy
  • Put new wiring in (maybe – maybe after the flooring is done)
  • Soffits between the wall and the ceiling to stop birds nesting up there again
  • Cut out the new stairwell and remove the old stair gubbins

And probably a bunch of other stuff too…

Save

Stripping The Attic Part II

What with all the sunny weather we’ve been having, we’ve been a little lax about getting on with the vast pile of indoor jobs…

But on Sunday, we ventured back upstairs to finish the pine-cladding destruction.

It went much as before: pine removed, many dust generated, nails removed, rafters exposed. And we discovered the ridge beam is not so much a beam as an entire tree trunk by the looks of it. We need to inspect it more closely, but so far it looks sound.

Actually, that’s another job we have to do: treat all the timber in the house for woodworm. That’ll be fun.

Anyway – you can see the progress we’ve made below. It’s pretty much bare now. We need to remove the cladding corpses and as much dust, nests, and dirt as we can, then we’re ready to look at the actual improvements.

Hurrah!

Bare rafters

Bare rafters

And the ridge beam:

Mahoosive oak (we think) ridge beam

Mahoosive oak (we think) ridge beam

We still need to pull all the electrics out as well, so we can rewire properly.

In the meantime, Fish – our floor man – is coming along on August 12 to look at the horizontal softwood timbers and advise on what we can do.

The oak floor is arriving on October 17 to sit for a few days…

And we start laying on October 24! Exciting times.

So before October 17, we have to:

  • Strip out all electrics
  • Clean out the entire space
  • Make sound any gaps at the base of the roofline and ensure the wall is cool
  • Cut out the area where the stairs will go
  • Blast and treat the exposed timbers
  • Lath and lime plaster (we think) the sloping walls/ceiling

Suddenly that seems like quite a big list, considering we’re having a holiday in between now and then…

Attic or loft? And Lots of Dust

We’ve done a lot of garden maintenance over the past few weeks. Mostly mowing and viciously attacking the nettles (and we’ve not made much of a dent in either, if we’re honest).

What we haven’t done much of is make progress indoors. That’s been frustrating me (Vix) because there’s so much to do.

So, this past weekend, we decided to Make A Dent In The Attic. Literally.

Here’s what it looked like before. The sleeping end:

Joe contemplates the sleeping end of the attic - pre-destruction

The sleeping end (and a prisoner on day release)

You can see there’s fibre-board laid between the beams and over the rafters. And there’s a whopping great big ridge beam that looks original (hurrah!).

And here’s the other end – there’s going to be a dressing / sitting area in the middle, then a shower room at the far end. (It’s a huge space.)

Attic space with original beams and pine cladding

The other end, complete with dodgy sauna cladding

You can see at this end, there’s pine sauna-esque cladding running up to the “ceiling”, which has been lowered. We’re going to remove all this and expose the original ridge beam.

Where the paint line is, is where the old train set ran around the room. The chap who lived here had this amazing train set. He’d built an entire landscape, and it must have been quite the thing when it was going. I love miniature stuff, so I would’ve loved to have seen it. It was mostly disassembled when we moved in, so we took the rest out and gave the train tracks to Joe’s niece’s friend.

Anyway – the weekend task was to rip as much of the cladding out as we could. We’re stripping it right back to the rafters and then starting again.

We’re also considering putting new oak beams in to support the roof, because the white ones you can see in the photos are cheap softwood. They’ve also been bodged in and are a right mess where they join at the truss. We’re not boxing them in because we want the space, so we’re considering replacing them with oak, which will look amazing and will last longer than we will.

Watch this space.

This is the old staircase opening, which we’re removing. The staircase is serviceable for occasional attic use, but no good for regular use.

Old staircase opening

Old staircase opening

We’re having a new solid oak staircase built by the same chap who built our friends’ beautiful new staircase. We’re widening the opening at the top and it’ll look amazing. We’re also thinking we might have stairs built up to the truss so we can climb onto the beam easily then faceplant into bed from a height. Fun!

Here’s the plans drawn up by our master craftsman. It’ll be in before Christmas…

Our chosen stair plan.

Our chosen stair plan.

In the meantime, though, here’s how far we got with the destruction…

Exposed rafters and one of many wasp nests

Exposed rafters and one of many wasp nests

This is pretty much what the sloping walls look like now. We uncovered three solitary queen wasp nests, beautifully built. And a full, gorgeous paper wasp nest. All abandoned.

And bird nests. Not so much nests, actually, as an entire bird housing estate… I think that was mostly responsible for our roof insulation. Thankfully, the roof and the weatherproofing are in really good condition.

There is, however, a random course of bricks that has been placed beneath the roof where the walls join, so we’re going to need to look at that. Not least because they all move alarmingly when you at them hard. I think a soffit should be there. We’ll dig into that.

We haven’t uncovered the ridge beam yet – that’s next weekend’s dirty task.

In the meantime, here’s a beautiful wasp nest that resembles The Scream

Wasp nest that resembles The Scream

The Scream

Next up: finishing the destruction, then installing new horizontal beams and starting the plastering.

In which we feel enTITLED to be rather chuffed

Our deeds have arrived!

And we’ve finally been able to shed some light on how old The Dingle might be, because the earliest record of sale that we have – beautifully written on vellum and parchment – is from 1772.

Photograph of the deeds of sale of The Dingle in 1772

They don’t make ’em like they used to…

One John Mascall sold The Dingle – conveying messuage, orchard, garden, with appurtenances – to Mr Edwards.

We’re not sure if this was the first sale of the house, or just the earliest record we have; but either way, it seems likely that the house dates from the mid-1700s. We’ll keep digging, and take the whole lot to the Records Office in Hereford at some point.

I spent an afternoon there last week, and had a root through the 1841 census records. The Dingle was in use as a shop at that time, and I think was counted as two separate units – but I’m not sure.

I do know that George and Mary Bannar, their daughter, and their twin sons lived there during that census, and that George was an agricultural labourer – like most able-bodied men at that time, I’d guess.

Fascinating stuff, but it hasn’t shed any light on whether or not there was ever a quarry here.

The Dingle itself is definitely man-made – it’s a long, thin valley in an otherwise uniformly steep slope. There are the bones of rocks poking out the sides. There’s also a mysterious alcove in the right-hand end wall. Perhaps it was a toll booth?

Our neighbours in Monkerton House, next door to the pub, have suggested that their house was built from stone from The Dingle quarry, but I can’t find any hard evidence of this!

Detective mode on. Updates will follow.

In the meantime, we’re going to look into getting that earliest deed framed, because it’s beautiful.

Stairway to Heaven

So, behind our house there is a courtyard (currently a weed-yard, soon to be a beautiful flag-stoned eating area), and from that the ground slopes up steeply into the Dingle.

Then, the bank on the right-hand side slopes steeply up to the main garden and orchard.

Steps beneath a honeysuckle arch

Steep slope on the right

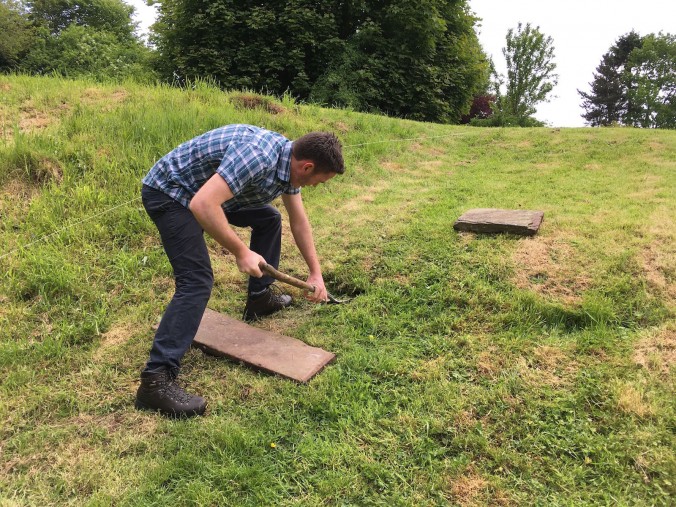
It’s slippery in the wet and quite tough for our parents (and for us, to be honest!) So, we decided to build some stone steps into the bank. We want them to look like they’ve been there forever, and they will do after a few weeks I think.

It was much simpler than we thought it would be in the end, and took us only just an afternoon in the hot sun. Powered by dandelion and burdock and chocolate cake. We started by working out how many steps we’d want to make it a fairly easy walk up the hill. We didn’t want the space between each stone to be too big, or the step up or down too large.

Then we laid the stones out where we wanted them, and started digging around them. We removed wedges of grass around the same size as each stone…

Joe digging a hole for the stone

Diggin’ an ‘ole

And dropped the big lumps of stone into the ‘oles…

A hole and a lump of stone

An ‘ole

We did go to a reclamation yard just up the road, which is filled with all manner of amazing treasure and we will be going back… but when we found the stone, here’s how the conversation went:

Joe: “How much for a pallet of sandstone?”

Man at yard: “£100 a square metre”

Joe: “You mean a cubic metre?”

Man at yard: “No”

Joe: “…”

So then we remembered all our garden walls and actual house are made out of stone, so we figured there must be some lying around in the garden. Happily, there was! Some in the courtyard (some of which is huge and will be turned into a BBQ) and some languishing under the Bridge of Death.

So we rescued it all and carried on building…

Joe building steps

Not a builder’s bum in sight

And this is the result. We’re pretty bloody chuffed with it, all things considered. And Noodle definitely approves, so that’s alright then.

Noodle cat sitting on the top step

Finis! And it has the Noodle Cat seal of approval

Next garden building project: the bank up to the Bridge of Death*. It’s very picturesque (covered in buttercups and all manner of English country flowers) but very steep. So we’re putting steps in there, too. Although we’ve run out of stone…

*Now known as the Bridge of Significant Peril, because we’ve since repaired some of the slats.

What’s This?

In our garden, just before you get to the orchard, there’s a mahoosive patch of nettles. We started obliterating them last weekend, and found this:

What's this?

What isssit?

Buried under the many nettles was a large piece of corrugated metal. We’re hoping for some kind of a bunker filled with buried treasure, but we’re being realistic. We’ll settle for just an exciting bunker.

It’ll probably turn out to be Mr G’s method of killing weeds, but we’re keeping our hopes up.

Any thoughts?

Tales From The Septic Tank

We’ve never been responsible for a septic tank before. In case you’re not familiar with such a beast, it’s basically a big hole in the ground into which goes everything that goes through us. Plus the washing up water, laundry water, shower water, etc.

It’s a bit grim. Well, it’s not, because luckily our tank is healthy… but it is.

Normally, your waste will drain away into your septic tank, then the septic tank will do its thing (more on that shortly), then it drains away downhill into a soakaway.

But here at The Dingle, things are slightly different. Of course 🙂

The house itself is in a dip at the bottom of the rise of the garden, about 12 feet off the road. So there’s no downhill for our waste to soakaway to. It’s highly illegal (thankfully) to drain effluent into public water courses or drains. So what’s going on here?

Good question.

Our tank system is pretty old, and a bit awkward: there’s a mechanical pump operated by a switch in the Rayburn Room, which means we have to remember to pump the tank every few days. We’re obviously going to replace this with an automatic system in the next year or so, but for now it’ll do fine.

Because we’re at the bottom of a hill, the grey water has to go uphill. So there’s an awkward arrangement of pipes at the front corner of the house that, frankly, is a bit unsightly. See:

Old-style septic tank

The poo hatch!

The metal hatch is the poo inspection lid (lovely). The brick contraption houses the mechanical pump. The black pipe that disappears into the bank takes the grey water away to…

…who knows where? At this point, we’re not entirely sure where the soakaway is, but we have our suspicions. The good news is, there’s no horrifying, B-movie-style bubbling and no smells, so wherever it is, it’s healthy.

The bad news is, we really will need to replace the system – or at least upgrade it – at some point. Preferably sooner than later. We heard a rumour we may be able to claim it on the buildings insurance, so fingers crossed.

The tank itself is pretty cool though. We had a chap out to empty it and take a look, and according to him it’s in good condition and healthy. We have nothing immediate to worry about, which is somewhat of a relief.

Since then, I’ve been learning about septic tanks. Many, many homes in rural areas rely on septic tanks because it’s just not possible to hitch us up to the public sewage system.

Newer tanks are bottle-shaped and made of plastic, buried underground; older ones (which we have) are usually large rectangular boxes of brick, stone, or concrete, buried underground. It’s a simple waste water treatment works.

Waste material – charmingly known as “sludge” settles in the bottom of the tank for natural bacteria to digest. It builds up, so we have to have it emptied every year or so to make sure it continues to work properly and to prevent the soakaway becoming choked.

Then the grey water drains off into a soakaway, usually a pit filled with gravel. They tend to be quite big, so are a massive pain in the backside to replace or work on. Also, it’s very expensive.

We need to find where the soakaway is to check the discharge is light grey and doesn’t include any solids.
I’ve discovered that expensive, posh toilet roll is a no-no — it doesn’t break down easily, so can block the tank.

Bleach in anything but tiny quantities is also a no-no, as is antibacterial cleaning stuff, because it kills the friendly bacteria in the tank.

And chucking cooking oil down the sink is a bad thing, because that can solidify and cause blockages.

We need to keep all this in mind when we build the new kitchen extension… but for now, everything seems to be working beautifully.

Happy days!

« Older posts Newer posts »

© 2025 Project Dingle

Theme by Anders NorénUp ↑