The original Dingle structure is oak frame with infill panels on top of stone walls. When the house was built the infill panels would have been wattle and daub — essentially sticks woven together and covered in daub (mud, clay, straw and manure) or lime. Any paint would have been clay-based or a limewash. This method would have been perfect for the oak frame – it doesn’t weigh much, it keeps the weather out, it’s easily repairable using local skills, and it wicks water away from the oak and evaporates it to atmosphere, so the oak doesn’t rot. Perfect.
However, at some point the panels started to look a bit shabby and someone decided to replace them with bricks and mortar. This probably felt like a good idea: the local brickie liked the plan, bricks are pretty cheap, and who uses wattle and daub these days anyway?
The shabby panels get replaced.
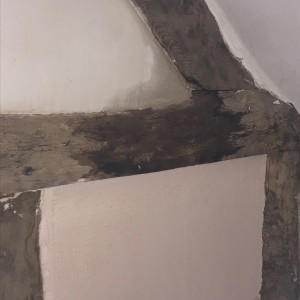
A couple of seasons come and go, the house shifts a bit because it’s built on clay and doesn’t really have any foundations (foundations not being a thing before around 1800), cracks appear, and water gets between the timber and the bricks. Because it’s modern cement-based mortar, the water can’t go anywhere and starts eating the oak. Oak takes a long time to rot, but it does rot eventually.
When we moved into the house, we knew the panels had to go. The bricks were soggy, the walls were damp, the oak was damaged and getting worse. We’ve posted about the task of replacing the panels themselves – it was quite the job.
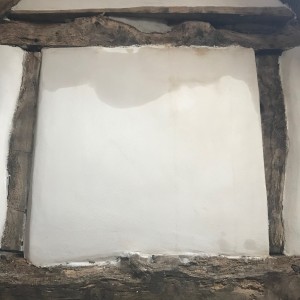
Internally, after replacing the panels, we were left with this:
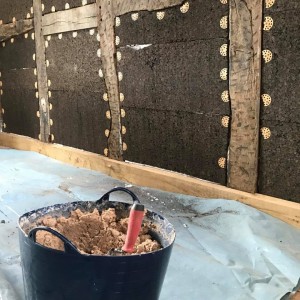
We replaced the panels with cork because: it breathes, doesn’t weigh much, is very insulating, and requires little skill to do (which suits us perfectly!). However that’s not really what you want the inside of your house to look like, so lime plastering is the next task.
Here’s how we did it…
**Disclaimer – I’m not an expert and you should probably get some grown-up advice if you’re considering tackling lime work yourself.
The Scratch Coat
Shopping
You will need:
- Builders bucket
- Hawk, trowel, pointing trowel and bucket trowel
- Bucket mixer
- Hemp lime (we got all our lime from Ty-Mawr in Brecon, who are super knowledgeable and helpful)
- Finishing lime
- Fibreglass scrim
- A few cheap sponges (ours came from B&Q)
- Gaffer tape
- Something to cover your floor
- Safety specs (lime is horrible, you do not want splashes in your eyes even a little bit, at all)
- Spray bottle for water

- Give the wall a good brushing. Get any loose dust, bits of cork, and spiders off it.
- Apply gaffer tape to your timbers so you have a line to work up to, and any plaster that goes over the line isn’t staining the wood. (We learned this after making a right mess with a bunch of the timbers.)
- Get a spray bottle and dampen the surface down.
- Knock up your lime. I used bagged non-hydraulic hemp lime for this job from Ty-mawr in Brecon. The lime is ready-mixed and just needs waking up. The idea is to get energy into it, which loosens it up and makes it easier to work with. We do this by chucking a 25kg bag of lime on the floor and walking on the spot on top of it for a few minutes. Then we open the bag and tip it into a builder’s bucket and mix with a bucket mixer for at least 20 minutes. If after that time it still feels a bit thick you can add maybe half a pint of water and keep mixing.
- Make a cup of tea, lug the bucket upstairs, and dampen the wall again. Cover your floor – this will be messy.
- Dollop the muck (that’s a professional term folks, don’t judge me) onto the hawk and get it onto the wall with the trowel. Aim for something like 10mm or half an inch thick. The first panel you do will be rubbish – don’t worry about it, you can do it again later. Watch some videos on YouTube to check out how the pros do it. The more plastering you do the quicker and easier it’ll be and the better you’ll get at it (funny that).
- Get the muck on the wall, get it more or less flat, and drink your tea.
- Scrim. Plasterers’ scrim is a reinforcing fibrous mat or cloth pressed into the plaster, creating a composite material. It strengthens the plaster and helps prevent cracking. In days gone by, a scrim would be jute or hemp sacking; these days it’s usually a fibreglass sheet on a roll. Cut a piece slightly smaller than your panel and sweep your trowel to press it into the plaster. Make sure the whole thing sits under the surface of the plaster.
- Clean your bucket and all your tools really well — you don’t want to start your next day’s work by chipping plaster off your nice new tools. Pay particular attention to your bucket and trowel. Bits in your bucket will make for scratchy plaster tomorrow.
And that’s it for a few days.
Sit back and worry about how you’re going to make it look tidy in the future.
The Top Coat
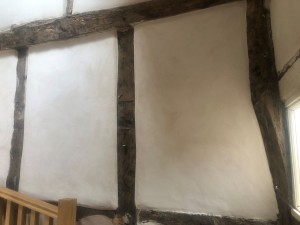
I was worried about this – I knew my skills were pretty minimal, I knew I wouldn’t get a beautiful professional finish… but I was honestly surprised how well it went. Our house is pretty wonky though, so wonky panels wouldn’t really matter so much.
(Editor’s note from Vicky: he did a cracking job. It looks beautiful.)
The top coat process is the same as for the scratch coat, except you’re aiming for maybe 3mm thick, and you’re trying to get the surface as flat as you can. I also had to deal with pillowing my panels (where the plaster curves away from you to meet the timbers). It looks great and we had no choice because of the size of the timbers… but I hope you don’t have to because it’s a faff.
When you’re halfway through this process you’ll be screaming inside. Something along the lines of: “I can’t get it flat!” and “It’s got scratches in it!” and “This is going to look shit!” and “I can’t do this, I’ll have to get someone in.”
Do not panic. Go and make another cup of tea (or at least leave the wall alone to dry for a few minutes).
The Magic Sponge
This is where the magic sponge comes in. Get your sponge thoroughly wet and squeeze it out. Put on some calming music. Now just spend 10 minutes with your sponge gently rubbing over the surface of the plaster. You’ll find the scratches disappear, the surface softens, lumps get evened out, edges get rounded.
It’s honestly magic.
Use your spray bottle if the wall is drying too quickly; dampen your sponge a bit if you need to. Get a feel for what’s going on and breathe a huge sigh of relief. It’s going to be ok.
When you’ve got it looking nice, stop. Peel off your gaffer tape.
Congratulations, you’ve done it!
Now you’ve just got to do the rest of the house.
Health & Safety
Lime is pretty hard on your hands – it’ll dry out your skin and eventually your skin will crack. This is painful.
Wash your hands often and moisturise them regularly.
I had some pretty nasty cracks and burns on my hands after a few days of working with lime. I tried wearing plastic gloves but that just meant I had sweaty wet lime pressed against my skin for hours which did far more damage.
Happy plastering!