The room that will become our bathroom is on the first floor of the Victorian stone portion of the house. The stone walls have been lime plastered in the past, patched with gypsum plaster, and then skimmed with gypsum, painted, wallpapered, painted again, and generally added to over the years.
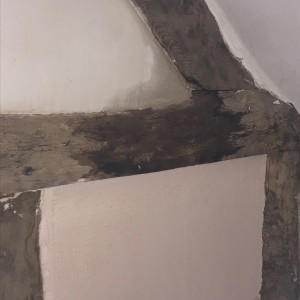
As we’ve taken layers of wallpaper and paint off, we’ve had a bit of a conundrum: plaster has come off in places too, which is pretty common in old houses. Plus the tops of the walls, where they disappear into the ceiling, were a right mess.

Messy messy walls
What to do?
Do we patch the holes and skim over?
Pull all the plaster off and start again from scratch, filling in all the big holes?
Or do we build a new set of walls inside the old walls, leaving the surfaces as-is, and have a more-or-less square room?
Vicky was in favour of pulling the whole lot off and starting again; Joe was in favour of building a framework inside the walls.
In the end, when faced with the magnitude—and dusty mess—of basically pulling down the walls, we decided to batten the walls and put up wood-wool panels ready to take lime plaster.

Battens going into the wall to hold the wood-wool panels
Our main concern was losing too much room area by effectively bringing in all the walls by a couple of inches each—but it’s a large room.
How We Did It
We bought a whole bunch of 38 x 18 mm battens from B&Q, and fastened them to the walls as a frame. We measured the frame so that the wood-wool panels from Ty-Mawr would fit neatly to them.
This was actually a monumental pain in the butt because it involved masonry drills and not really knowing whether or not any of our plans would actually work…

We really did have a right old time with this
We piloted through the battens to prevent them splitting, then used a masonry drill bit to put holes through the plaster and into the solid stone of the wall.
This proved super-irritating because quite often we’d miss a stone, or it would shift, or the gods of renovations would just be in a bad mood that day. It was a trying time.
Once the holes were drilled, though, we screwed the battens into the walls using 120mm concrete screws. That frame is solid as a very solid thing.
We were genuinely worried we were not going to be able to find anything to work on those walls, and that we would end up having to pull all the wall surfacing down and start again. Thankfully, though, the screws held and we were able to start fixing the wood-wool panels thusly:

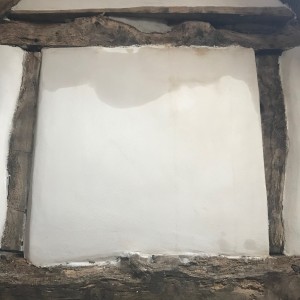
First panel goes on
These lining panels are simply screwed into the battens using wood screws and big plastic washers to spread the load and prevent the screws being pulled through the panel. They’ll take lime plaster beautifully. The room already looks vastly different:

Room’s looking swish and ready for plastering

Looking much tidier
One of things we’re pleased with is the main window, which was a right mess. The window “ceiling” was pretty much open to the eaves and we were losing loads of heat, so we stuffed a bunch of insulation up there, then built a mini-frame with battens to hold the wood-wool. We had to make wedges because the window slopes backwards, and we needed to leave as much of the oak windowframe visible as possible to allow as much light in as we could:

Then we fixed the wood-wool panels and now a multitude of horrors are hidden, the wind no longer whistles in, and it’s tidy tidy tidy:

Look at that! Out of sight, out of mind…
We’re pretty chuffed with the result and we’re excited to see how the plastering goes.
The room still feels pretty large for a bathroom, it’s much warmer, much more soundproof, and it’s definitely going to be easier to work with.
We’re getting quotes for plastering to be done for us because we don’t fancy plastering the ceiling and dealing with the loft hatch. The plan is to have softly rounded plaster around the window frames, and oak windowsills, which we’ll need to install before any plastering is done.
Then we’ll be creating a waterproof shower cubicle by building a stud wall and lining it with specialist tiling wall panels and a ceiling panel that are all fully waterproof—then tiling it.
More on that next week…
Oh—and also!
Ken came along and built us a new doorframe:

Before: wonky and saggy

After: beautiful wonky oak doorframe
You may be wondering why we didn’t just straighten up the top of the doorframe. Which is a reasonable question.
You can see the stonework above the doorframe—there was no proper stone lintel, and we didn’t fancy taking out that structural stonework to make the doorway higher. And to level it below the stone would mean an extremely low doorway for Joe to limbo through. So wonky it remains. Much like the rest of the house.
Then we had a quote for an oak door from the guy who does our windows (who is amazing) and we laughed and laughed and decided a summer project for us would be to make our own oak door because how hard can it be?