Restoring an old cottage...

Month: March 2021

Bats in the Not-a-Belfry

There’s a line in the Discworld book The Truth, by Terry Pratchett, that goes:

“A lie can run around the world before the truth has got its boots on.”

Case in point: if you have or suspect bats in your house, They say that it’ll cost you one meeeeeeeeellion dollar to do any works you had planned, if you’re allowed to at all.

Honestly, the number of people who have said to us, when we’ve mentioned bats or newts, “Ooh don’t say anything because otherwise you won’t be allowed to do any work or make any changes and you’ll get prosecuted etc. etc. etc.”

I always suspected that was batbullshit, and I was right. Plus, we are tree-huggers and we are happy to host bats and newts. Bats eat midges. Newts are awesome.

(There are fascinating psychological reasons why this kind of nonsense story perpetuates despite a screaming lack of any evidence, and if you’re interested — and you should be — check out the book Made to Stick by Chip and Dan Heath.)

Anyway, back to the batshit.

The next mini-project in the ongoing saga of The Dingle is the Stone Room on the first floor. It is to become the Most Magnificent Bathroom in the World.

There’s plenty to do in there, and you’ll be able to follow along as we go… but one of the first jobs was to pull down the ceiling and put a new one in.

Because the current ceiling is made of spiderwebs, cheese, cheap bolts, and hope.

When we had our new boiler fitted (blog post to follow about that shortly), we were finally able to drag the water tanks out of the loft space above the Stone Room and get rid of them. When we went up there to do that, we noticed what a shocking state the ceiling was in.

And we also noticed this:

A giant pile of poo

A giant pile of poo

Which is a giant pile of what we thought was bat poo. Certainly very small poos, and lots of it.

We did some googling, crumbled it between our fingers, and came to the conclusion that it was probably bat poo.

Plus, we know we have lots of bats flying around The Dingle of an evening, and although we’ve never paid that much attention to where they appear from and disappear to, old houses are perfect for bats.

So I called the Bat Conservation Trust for advice.

(Actually, I called a consultant I found on the internet, and we had a chat, and he recommended I contact the BCT because they do free checks and advice, whereas we’d be paying him. Good man. Thank you.)

Today, a volunteer and a trainee volunteer from the BCT arrived and had a look around. In ordinary times, they’d have come in and poked around themselves, but COVID has scuppered that kind of thing, so we got modern and used technology.

They asked for samples of the poo, and we FaceTimed around the loft space.

Up I went in my overalls to stagger around on the ceiling (did I mention it’s made of cheese and spiderwebs and isn’t fit to support anyone let alone a person?) and gather little pots of poo.

The poo from the main pile was definitely bat poo. They’ve taken it away to see if they can identify what species we have. And the poo from the other end was bird poo and mouse poo. Which is good news for us if the bats are only at one end of the roof space.

We’re quite keen to get this sorted because there’s water ingress when it rains on the interior wall, where the flashing has come away from the roof-wall interface. You can see the water damage here:

Not really dry…

Not really dry…

Ken our timber guy reckons it’ll be fine with a bit of reinforcing which is grand because we DO NOT want to replace the purlin and do major roof works. Plus that will require all sorts of licences for the bats.

And at the other end, there are large holes between the wall and the roof, and some of the fascias are rotting so we’ll need to replace/repair and cover those, and we need to know what we can do.

Daylight where daylight should not be

Daylight where daylight should not be

The volunteers are going to write up their report over the next day or so, and put it through to Natural England as an urgent job for us.

We expect to hear back in 2—4 weeks, and he said it’ll probably be more like 2 weeks.

They could not have been more helpful. Their main aim is twofold: to protect the bats AND to enable us to get on with the work we want to do as quickly and inexpensively as possible.

They’re well aware of the nonsense people believe: that conservationists deliberately make it difficult for people to do work.

Of course they don’t. It’s not in their interests. Because when they make it difficult for people, people don’t declare bats and do all sorts of stuff that harms the bats.

Bats are great: they don’t cause damage, most of the time we don’t even know they’re there, and they eat tons of insects. A common pipistrelle bat can eat 3,000 midges and mozzies and flies in a single night!

And it’s really easy and inexpensive to provide for them.

The only issue really is timing: they build maternity roosts from around May until the end of August, so we won’t be allowed to do any work that could affect access between those dates.

That won’t be a problem for us, we’ve timed it well. We’ll be able to build the new ceiling and block the loft space off, leaving the bats in peace until the end of summer. Then we can go back up and do any further work we need to do.

Probably what we’ll have to do is partition off a portion of the loft space for the bats, and then put a droppings tray on the boarded out floor so we can remove droppings once a year. (Which is cool because bat droppings are fantastic fertiliser for my vegetable beds.)

We’re fine with that. It’ll cost us a few quid and we can do the work ourselves, and we’ll be helping the bats, which makes everyone happy.

So, if you suspect bats in your house, and you’re worried about it scuppering your plans to renovate or repair: don’t be.

Ignore people who like spread rumours without having facts, and give the Bat Conservation Trust a call. Their volunteers are super-friendly and helpful, and will work with you to do the best for you and the bats.

Thank you BCT!

Moisture Management in Old Houses

Old houses are not the same as modern houses, and we can’t treat them the same way.

They’re designed to breathe and when they’re treated well, damp isn’t a problem.

Ancient buildings like this one don’t have a damp course in the walls to stop moisture being sucked out of the ground and into the walls. They also don’t have an air cavity in the walls to stop water transmission from rain on the outside surfaces to inside the house. Often there’s an oak frame that really does not mind getting wet as long as it has a chance to dry out afterwards.

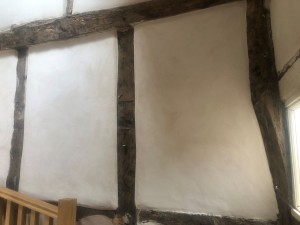
Newly plastered wall panel

You can see the damp on the old brick panels

It’s really important to think about moisture management in an old house like ours.

It’s tempting to make efforts to stop the movement and transmission of this moisture altogether. Here’s some stuff people do to old houses to try to accomplish this:

  • Using modern waterproof grout to repoint all the stonework.
  • Laying a concrete slab under the ground floor
  • Using modern renders on the walls, internally or externally, to stop water moving around.
  • Painting with modern plastic paints.
  • Getting a damp-proof company in to inject the stonework with oily stuff to act as a damp course (many of these companies are absolute vandals when it comes to old buildings).
  • Pulling out original frame panelling and replacing it with modern bricks and mortar.

We found a lot of this stuff in The Dingle when we got stuck in, and it’s really common in old houses that have been “improved”. The problems are, though, that:

  • The concrete slab pushes water up the walls.
  • The modern grout traps water next to the stone. Cement grout is harder than the stone itself, so when the water freezes in cold weather, it puts pressure on the original stones and cracks them.
  • The new render on the outside of the house traps water against the frame and panels causing the frame to rot.
  • The brick infill panels trap water against the oak, ensuring it never dries out.
  • Internally, water vapour from breathing, cooking, and bathrooms is trapped inside, causing the walls to become permanently damp and develop mould.

All that well-intentioned effort makes such a house a horrible damp place to live, and eventually destroys the building.

So here is where we need to talk a little about lime and its purpose in an old house like The Dingle.

We can use lime as a mortar between stones and brickwork, and as a plaster to cover the stonework or anything else your walls might be made of. Lime is magical:

  • Lime is waterproof in that it soaks up moisture, and then releases it to the atmosphere.
  • Lime wicks water away from timber or stones and allows it to evaporate away.
  • Lime has natural anti-fungal properties and does not allow mould to grow.
  • Lime is a little bit flexible and does not crack easily.

Lime was essential in building a house like this one. If we remove the lime and replace it with cheaper modern equivalents, we will wreck the house. Stones will split, timbers will rot, walls will grow mould.

Modern materials are fine for modern houses, which are designed to be airtight and watertight. They are not fine for old houses.

If you own an old house and a tradesperson is talking about using modern mortar, plastic, concrete, modern paint… please please please think very hard before going ahead.

Get advice from someone who specialises in working with old buildings.

If you try to shoehorn modern methods into old houses, you could well be doing huge damage to your home.

The Magic Sponge: The Secret to Internal Lime Plastering

The original Dingle structure is oak frame with infill panels on top of stone walls. When the house was built the infill panels would have been wattle and daub — essentially sticks woven together and covered in daub (mud, clay, straw and manure) or lime.  Any paint would have been clay-based or a limewash. This method would have been perfect for the oak frame – it doesn’t weigh much, it keeps the weather out, it’s easily repairable using local skills, and it wicks water away from the oak and evaporates it to atmosphere, so the oak doesn’t rot. Perfect.

However, at some point the panels started to look a bit shabby and someone decided to replace them with bricks and mortar. This probably felt like a good idea: the local brickie liked the plan, bricks are pretty cheap, and who uses wattle and daub these days anyway?

The shabby panels get replaced.

A couple of seasons come and go, the house shifts a bit because it’s built on clay and doesn’t really have any foundations (foundations not being a thing before around 1800), cracks appear, and water gets between the timber and the bricks. Because it’s modern cement-based mortar, the water can’t go anywhere and starts eating the oak. Oak takes a long time to rot, but it does rot eventually.

When we moved into the house, we knew the panels had to go. The  bricks were soggy, the walls were damp, the oak was damaged and getting worse. We’ve posted about the task of replacing the panels themselves – it was quite the job.

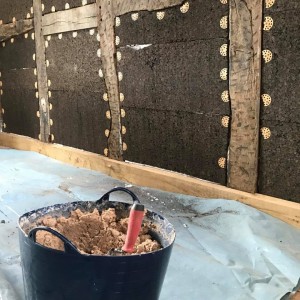
Internally, after replacing the panels, we were left with this:

plaster 1

We replaced the panels with cork because: it breathes, doesn’t weigh much, is very insulating, and requires little skill to do (which suits us perfectly!). However that’s not really what you want the inside of your house to look like, so lime plastering is the next task.

Here’s how we did it…

**Disclaimer – I’m not an expert and you should probably get some grown-up advice if you’re considering tackling lime work yourself.

The Scratch Coat

Shopping

You will need:

  • Builders bucket
  • Hawk, trowel, pointing trowel and bucket trowel
  • Bucket mixer
  • Hemp lime (we got all our lime from Ty-Mawr in Brecon, who are super knowledgeable and helpful)
  • Finishing lime
  • Fibreglass scrim
  • A few cheap sponges (ours came from B&Q)
  • Gaffer tape
  • Something to cover your floor
  • Safety specs (lime is horrible, you do not want splashes in your eyes even a little bit, at all)
  • Spray bottle for water

plaster2

  1.  Give the wall a good brushing. Get any loose dust, bits of cork, and spiders off it.
  2. Apply gaffer tape to your timbers so you have a line to work up to, and any plaster that goes over the line isn’t staining the wood. (We learned this after making a right mess with a bunch of the timbers.)
  3.  Get a spray bottle and dampen the surface down.
  4. Knock up your lime. I used bagged non-hydraulic hemp lime for this job from Ty-mawr in Brecon. The lime is ready-mixed and just needs waking up. The idea is to get energy into it, which loosens it up and makes it easier to work with. We do this by chucking a 25kg bag of lime on the floor and walking on the spot on top of it for a few minutes. Then we open the bag and tip it into a builder’s bucket and mix with a bucket mixer for at least 20 minutes. If after that time it still feels a bit thick you can add maybe half a pint of water and keep mixing.
  5. Make a cup of tea, lug the bucket upstairs, and dampen the wall again. Cover your floor – this will be messy.
  6. Dollop the muck (that’s a professional term folks, don’t judge me) onto the hawk and get it onto the wall with the trowel. Aim for something like 10mm or half an inch thick. The first panel you do will be rubbish – don’t worry about it, you can do it again later. Watch some videos on YouTube to check out how the pros do it. The more plastering you do the quicker and easier it’ll be and the better you’ll get at it (funny that).
  7. Get the muck on the wall, get it more or less flat, and drink your tea.
  8. Scrim. Plasterers’ scrim is a reinforcing fibrous mat or cloth pressed into the plaster, creating a composite material. It strengthens the plaster and helps prevent cracking. In days gone by, a scrim would be jute or hemp sacking; these days it’s usually a fibreglass sheet on a roll. Cut a piece slightly smaller than your panel and sweep your trowel to press it into the plaster. Make sure the whole thing sits under the surface of the plaster.
  9. Clean your bucket and all your tools really well — you don’t want to start your next day’s work by chipping plaster off your nice new tools. Pay particular attention to your bucket and trowel. Bits in your bucket will make for scratchy plaster tomorrow.

And that’s it for a few days.

Sit back and worry about how you’re going to make it look tidy in the future.

The Top Coat

I was worried about this – I knew my skills were pretty minimal, I knew I wouldn’t get a beautiful professional finish… but I was honestly surprised how well it went. Our house is pretty wonky though, so wonky panels wouldn’t really matter so much.

(Editor’s note from Vicky: he did a cracking job. It looks beautiful.)

The top coat process is the same as for the scratch coat, except you’re aiming for maybe 3mm thick, and you’re trying to get the surface as flat as you can. I also had to deal with pillowing my panels (where the plaster curves away from you to meet the timbers). It looks great and we had no choice because of the size of the timbers… but I hope you don’t have to because it’s a faff.

When you’re halfway through this process you’ll be screaming inside. Something along the lines of: “I can’t get it flat!” and “It’s got scratches in it!” and “This is going to look shit!” and “I can’t do this, I’ll have to get someone in.”

Do not panic. Go and make another cup of tea (or at least leave the wall alone to dry for a few minutes).

The Magic Sponge

This is where the magic sponge comes in. Get your sponge thoroughly wet and squeeze it out. Put on some calming music. Now just spend 10 minutes with your sponge gently rubbing over the surface of the plaster. You’ll find the scratches disappear, the surface softens, lumps get evened out, edges get rounded.

It’s honestly magic.

Use your spray bottle if the wall is drying too quickly; dampen your sponge a bit if you need to. Get a feel for what’s going on and breathe a huge sigh of relief. It’s going to be ok.

When you’ve got it looking nice, stop. Peel off your gaffer tape.

Congratulations, you’ve done it!

Now you’ve just got to do the rest of the house.

plaster1

Health & Safety

Lime is pretty hard on your hands – it’ll dry out your skin and eventually your skin will crack. This is painful.

Wash your hands often and moisturise them regularly.

I had some pretty nasty cracks and burns on my hands after a few days of working with lime. I tried wearing plastic gloves but that just meant I had sweaty wet lime pressed against my skin for hours which did far more damage.

Happy plastering!

© 2025 Project Dingle

Theme by Anders NorénUp ↑

Project Dingle uses cookies and analytics to create a better user experience. Are you OK with this?